Using Gateway for Credential Mapping
- Kim Rasmussen
- Kim Rasmussen (Unlicensed)
- Jesper Nielsen (Unlicensed)
This article explains how you can use the Ceptor Gateway to do credential mapping from one format to another.
In this article, we will show how to map from Basic Authentication in an incoming request to Kerberos / SPNEGO on outgoing request - this enables you to provide basic authentication to clients for servers that only recognize Kerberos.
This can be very useful in scenarios, where you need the capability to support legacy applications using basic authentication that is connecting to for example REST APIs exposed on servers only capable of handling Kerberos where the client does not have the ability to use Kerberos or new installations of web application servers only supporting Kerberos for their web applications.
Making Kerberos / SPNEGO work in in the Gateway
In order to use SPNEGO / Kerberos (SPNEGO is short for "Simple and Protected GSSAPI Negotiation Mechanism" can be viewed as Kerberos via the HTTP protocol - in Microsoft Lingo, it is also referred to as Integrated Windows Authentication) you need to setup the environment first.
When launching the gateway, you need to set two system properties to point to the correct files;
-Djava.security.krb5.conf=${ceptor.home}/config/spnego/krb5.conf
-Djava.security.auth.login.config=${ceptor.home}/config/spnego/login.conf
You can place them in your launcher configuration as JVM arguments.
These are example values of the files, they need to be adjusted to fit the settings for your Active Directory server and domain name
[libdefaults]
	default_tkt_enctypes = aes128-cts rc4-hmac des3-cbc-sha1 des-cbc-md5 des-cbc-crc aes256-cts-hmac-sha1-96
	default_tgs_enctypes = aes128-cts rc4-hmac des3-cbc-sha1 des-cbc-md5 des-cbc-crc aes256-cts-hmac-sha1-96
	permitted_enctypes   = aes128-cts rc4-hmac des3-cbc-sha1 des-cbc-md5 des-cbc-crc aes256-cts-hmac-sha1-96
    kdc_timeout=2000
    dns_lookup_kdc=false
    dns_lookup_realm=false

[realms]
    MYDOMAIN.NET  = {
        kdc = 192.168.1.142
        default_realm=MYDOMAIN.NET
    }

[domain_realm]
    .MYDOMAIN.NET = MYDOMAIN.NET
kerberos-client {
    com.sun.security.auth.module.Krb5LoginModule required storeKey=false useTicketCache=false isInitiator=TRUE client=TRUE renewTicket=true debug=false;
};
	<!-- Ceptor Gateway -->
	<jvm name="gateway" vmargs="-Xmx1024M -Xnoclassgc -XX:+HeapDumpOnOutOfMemoryError -XX:+ExitOnOutOfMemoryError -Dorg.jboss.logging.provider=slf4j --add-opens jdk.management/com.sun.management.internal=ALL-UNNAMED -Dnashorn.args=--no-deprecation-warning -Djava.security.krb5.conf=${ceptor.home}/config/spnego/krb5.conf -Djava.security.auth.login.config=${ceptor.home}/config/spnego/login.conf" systemclasspath="">
		<config servers="loadbalance:nios://localhost:21233?validateservercert=false;nios://localhost:21234?validateservercert=false" />
		<classloader name="gw" extraclasspath="gateway;extlib_extras/groovy;extlib_extras/jython">
			<service name="gateway1" launcherclass="io.ceptor.gateway.GatewayLauncher">
			</service>
		</classloader>
	</jvm>
Creating a Destination
To begin with you need a destination (more details on creating destinations and how to create them here) - the location of your API or application server behind the Gateway. On this destination, you need to enable SPNEGO / Kerberos authentication, and use a userid and password that we later will add to the request attribute through a location definition, by extracted them from the request header using a Location Script.
Add a target server to your destination, and go to the Authentication settings - there, add the Authentication Plugin "io.ceptor.authentication.target.TAuthenticatorSPNEGO".

Now scroll down, and enter the userid and password for anonymous user (the user is anonymous as seen from Ceptor's viewpoint, since there is no authenticated session available - in this case, the userid/password is directly forwarded to the backend server.
Use the macros "%{requestattribute:basicauthuser}" and "%{requestattribute:basicauthpass}" for the Anonymous userid and password respectively
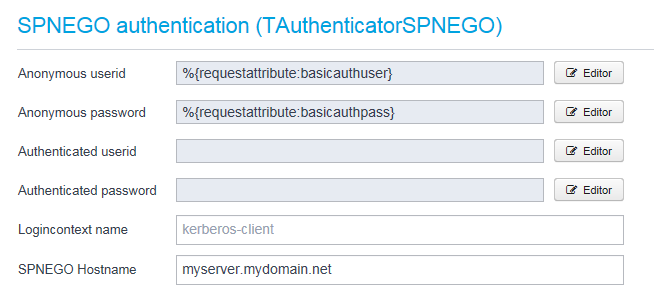
Also add the name of the server authenticating towards.
{
  "name": "my_destination",
  "description": "Example Destination",
  "targets": [{
    "name": "srv1",
    "port": 443,
    "host": "myserver.mydomain.net",
    "scheme": "https"
  }],
  "target.consul.enabled": false,
  "sslcontext": {
    "allowrenegotiate": false,
    "excludeprotocols": "SSL,SSLv2,SSLv2Hello,SSLv3",
    "useciphersuites.order": true,
    "excludeciphersuites": ".*NULL.*,.*RC4.*,.*MD5.*,.*DSS.*",
    "includeciphersuites": "TLS_ECDHE_RSA_WITH_AES_256_GCM_SHA384,TLS_ECDHE_RSA_,SSL_RSA_WITH_3DES_EDE_CBC_SHA,TLS_RSA_WITH_AES_128_CBC_SHA",
    "keystore.type": "PKCS12",
    "keystore.provider": "BC",
    "verify.server.certificate": false,
    "verify.server.name": false,
    "trusted.server.certificates": []
  },
  "ping": {
    "method": "HEAD",
    "uri": "/",
    "expect": "200",
    "interval.seconds": 0
  },
  "http2.enable": false,
  "keepalive.enable": true,
  "keep.hostheader": false,
  "sticky": false,
  "cookiesnapper": {},
  "authentication": {
    "plugins": ["io.ceptor.authentication.target.TAuthenticatorSPNEGO"],
    "spnego": {
      "hostname": "myserver.mydomain.net",
      "anonymous.userid": "%{requestattribute:basicauthuser}",
      "anonymous.password": "%{requestattribute:basicauthpass}"
    }
  }
}
Creating a Location
Next you need the location that, in this example will handle the extraction of the Basic Auth userid and password from the HTTP header and make them available to the destination authenticator. More details on locations and how to create them here.
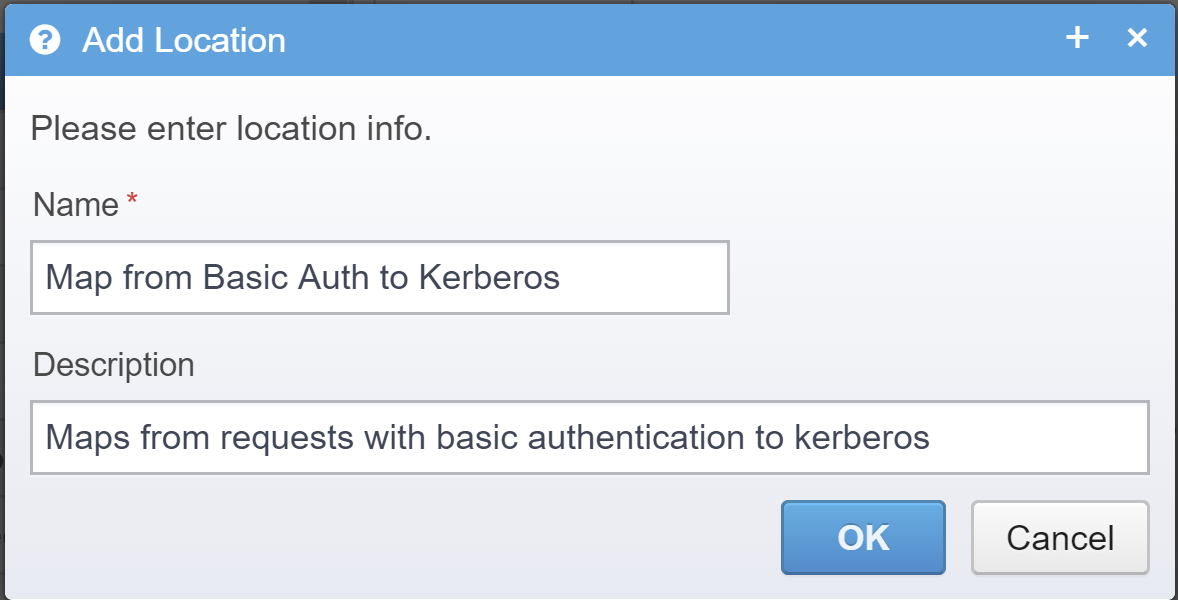
Go to locations in the Gateway configuration, add a new location, give it a name and description.
Press "Ok", then save the configuration and the location will show in the location configuration list on the left under location (if you need to, you can move it up/down in the list of locations so it matches a good position in your setup!). Now choose that location so we can configure it.
Make sure your connection is enabled, set it the action to proxy and select the destination you just created.

Add we some conditions to it, to make sure our location only triggers when we need to. For this simple example we know that we need to check for the Basic authentication header. Go to the conditions configuration item on the location, press "Add" to add a new condition and add a HTTP header condition named "Authorization" matching the pattern "basic *".
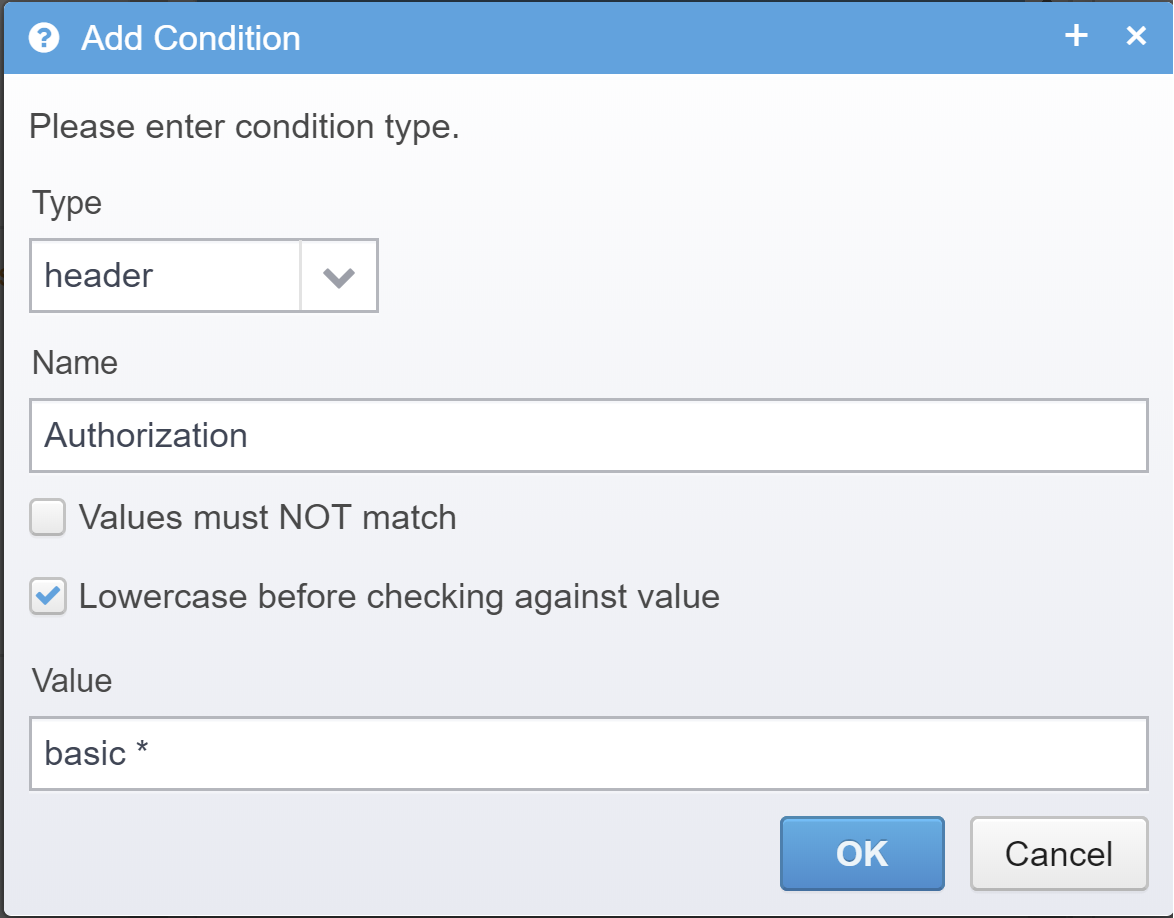
You might also want to add additional condititions, such as hostname, paths, etc - to only trigger for your required scenario.
Now we need to add some logic to the location - to extract the basic authentication userid and password. This can be done using a location script.
Go to the main location configuration item (where we chose among other things destination earlier). Scroll down and find the configuration item "Location script". Click on the "Editor" button to the right to add a script, pick JavaScript as the language and use this script as input:
function extractUserAndPass() {
    var authHeader = context.macro('%{requestheader:Authorization}');

    if (!authHeader || !authHeader.toLowerCase().startsWith('basic '))
        return;

    authHeader = authHeader.substring(6);

    var plainHeader = Java.type('dk.itp.security.utils.Base64').decode(authHeader);
    var ofs = plainHeader.indexOf(':');

    if (!ofs)
        return;

    var user = plainHeader.substring(0, ofs);
    var pass = plainHeader.substring(ofs+1);

    if (user.indexOf('@') <= 0)
        user += "@MYDOMAIN.NET";

    context.requestAttributes.put("basicauthuser", user);
    context.requestAttributes.put("basicauthpass", pass);
}

extractUserAndPass();
You will want to change "@MYDOMAIN.NET" to match the domain you want to authenticate the user towards.
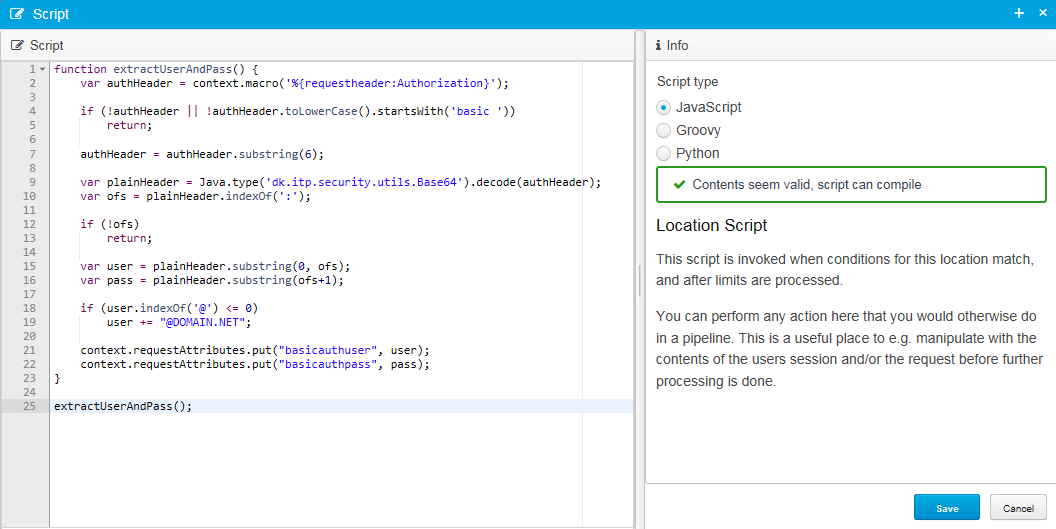
This script simply extract the userid and password from the authorization header, and stores them as basicauthuser / basicauthpass in the request attributes for later use.
Note: In order to test this at this point - you might need to restart the Gateway JVM. It is not enough to "start"/"stop" the Gateway through the control panel. This is due to the Kerberos configuration that needs to be loaded and the system property files are only read once by the JVM.
This is how the full location looks like - you can copy this directly into your Gateway Configuration instead of going through the guide above.
{
  "name": "Map from Basic Auth to Kerberos",
  "description": "Maps from requests with basic authentication to kerberos",
  "location.enabled": true,
  "session.needed": true,
  "session.afterconditionsmatch": true,
  "session.override": false,
  "content.preload": false,
  "valid.methods": "*",
  "action": "proxy",
  "proxy.destination": "my_destination",
  "response.compress": true,
  "cookiesnapper": {},
  "plugin": {},
  "url.validator": {
    "enabled": true,
    "verify.encoding": true,
    "query.key.maxlength": 1024,
    "query.value.maxlength": 8192,
    "maxlength": 32768,
    "verify.fullurl": false
  },
  "conditions": [{
    "type": "header",
    "name": "Authorization",
    "deny": false,
    "lowercase": true,
    "values": ["basic *"]
  }],
  "conditions.type": "and",
  "location.script": "%{script}function extractUserAndPass() {\n    var authHeader = context.macro('%{requestheader:Authorization}');\n    \n    if (!authHeader || !authHeader.toLowerCase().startsWith('basic '))\n        return;\n        \n    authHeader = authHeader.substring(6);\n    \n    var plainHeader = Java.type('dk.itp.security.utils.Base64').decode(authHeader);\n    var ofs = plainHeader.indexOf(':');\n    \n    if (!ofs)\n        return;\n        \n    var user = plainHeader.substring(0, ofs);\n    var pass = plainHeader.substring(ofs+1);\n    \n    if (user.indexOf('@') <= 0)\n        user += \"@DOMAIN.NET\";\n        \n    context.requestAttributes.put(\"basicauthuser\", user);\n    context.requestAttributes.put(\"basicauthpass\", pass);\n}\n\nextractUserAndPass();",
  "request.headers": [{
    "name": "Authorization",
    "value": ""
  }]
}
That's all there is to it, the above configuration makes Ceptor Gateway map from incoming Basic Auth to outgoing Kerberos / SPNEGO.
If you have any problems, use Gateway Tracing to diagnose the requests.
Related content
© Ceptor ApS. All Rights Reserved.