Location - Authentication
- Kim Rasmussen
- Kim Rasmussen (Unlicensed)
- Patrick Ahmed (Unlicensed)
Authentication
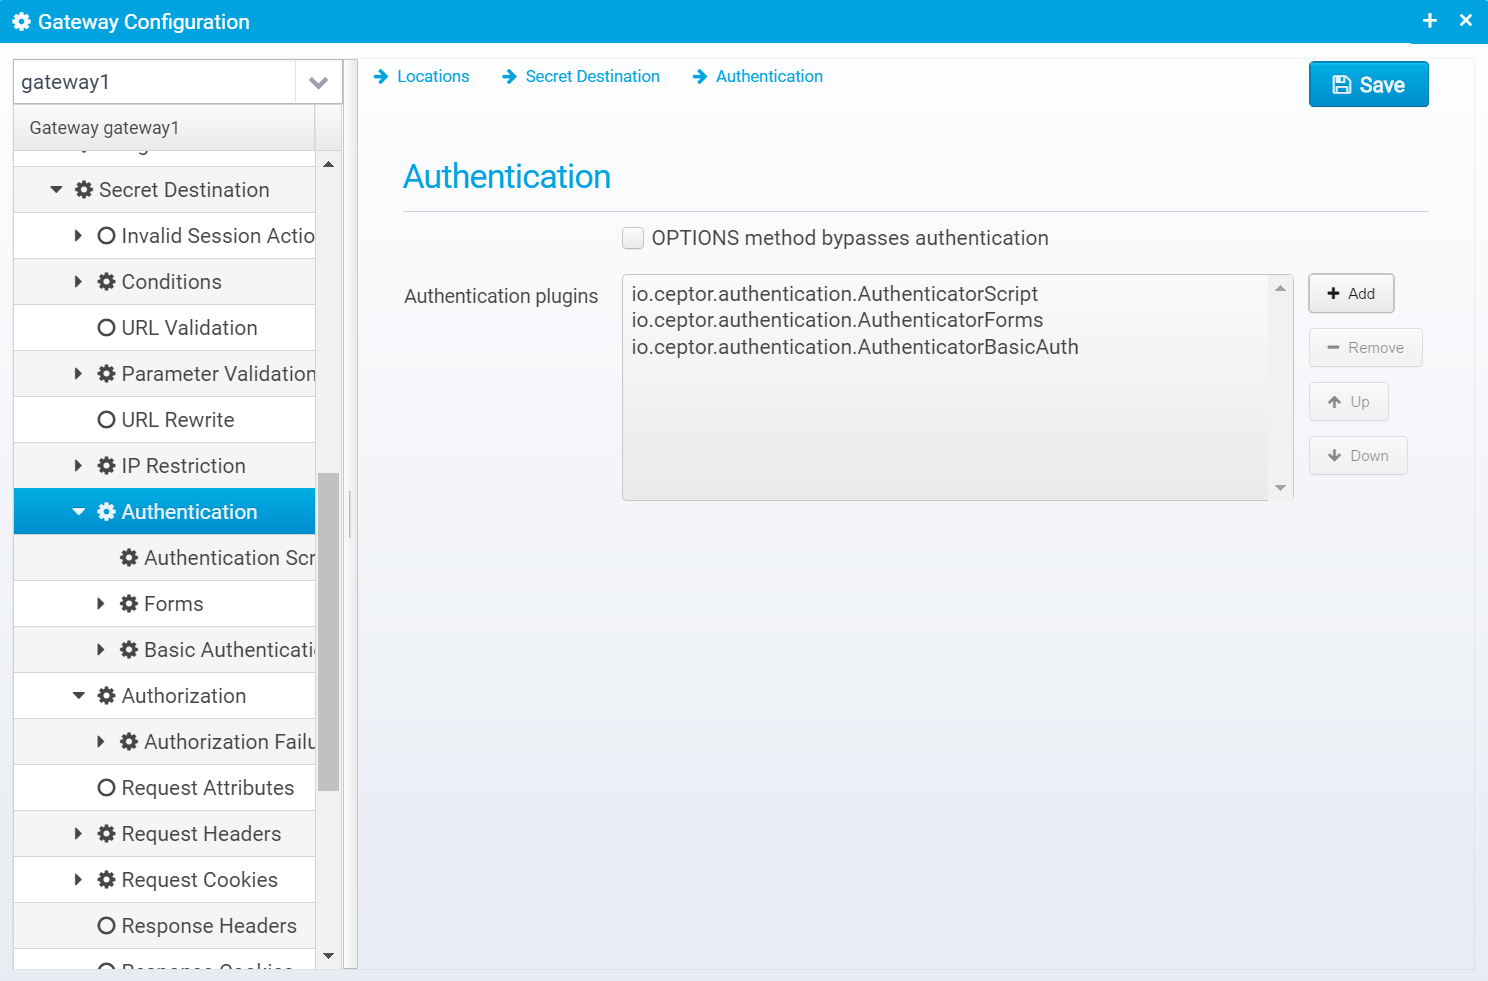
Here, you can specify a number of authentication plugins - each authentication plugin supports one kind of authentication.
By default, the following authentication plugins exist:
- io.ceptor.authentication.AuthenticatorBasicAuth
Allows authenticating using HTTP Basic Authentication - meaning the HTTP Request Header "Authorization" with contents "Basic xxxxxxx" where xxxxxxx is a base64 encoded version of userid:password. Please note that the password is not encrypted, but just encoded using base64 encoding, which makes this a relatively weak authentication method so the entire transport must be appropriately encrypted, using HTTPS. - io.ceptor.authentication.AuthenticatorForms
Supports using FORMS authentication, where user can authenticate using HTTP query or POST parameters. Is also often used to simply redirect to another forms page somewhere else - e.g. in a login application if the user is not authenticated. - io.ceptor.authentication.AuthenticatorNTLM
Supports NTLM authentication in an intranet environment. Note that you should use SPNEGO instead of NTLM wherever possible - NTLMv1 is required to be enabled on the server. - io.ceptor.authentication.AuthenticatorSPNEGO
Supports SPNEGO/Kerberos with NTLM fallback types of authentication in intranet environments. - io.ceptor.authentication.AuthenticatorOpenIDConnect
Allows use of OpenID Connect authentication - supports redirecting to authentication providers and handles the response from them - supports use of Authorization Code flow to obtain an ID/Access token from an authorization code. - io.ceptor.authentication.AuthenticatorSSLClientCert
Allows authenticating clients using SSL Client certificate. - io.ceptor.authentication.AuthenticatorWebSSO
Allows using ADFS / SAML WebSSO / WSTrust to authenticate users - supports acting both as an identity provider, and a relying party. - io.ceptor.authentication.AuthenticatorLTPAToken
Allows using an LTPA Token to authenticate users - allows easier SSO with certain IBM products. Supports creation and verification of LTPA2 tokens. - io.ceptor.authentication.AuthenticatorApiKey
Allows using an API Key to authenticate a caller - typically used for REST calls. - io.ceptor.authentication.AuthenticatorScript
Supports a javascript based authentication where you can write a script that authenticates any way you want based upon the incoming HTTP request.
See more information about authentication plugins here: Plugins#AuthenticationPlugin
Authentication plugins are listed in the plugins JSON array within the authentication JSON object within the location.
Depending on the plugins you have selected, you will get different authentication screens added under the "Authentication" tree.
OPTIONS method bypasses authentication
Check this if you do not want to attempt authentication for OPTIONS requests - this is required for CORS preflight requests to work in most browsers.
Default: false
JSON Key: noauthentication.for.options
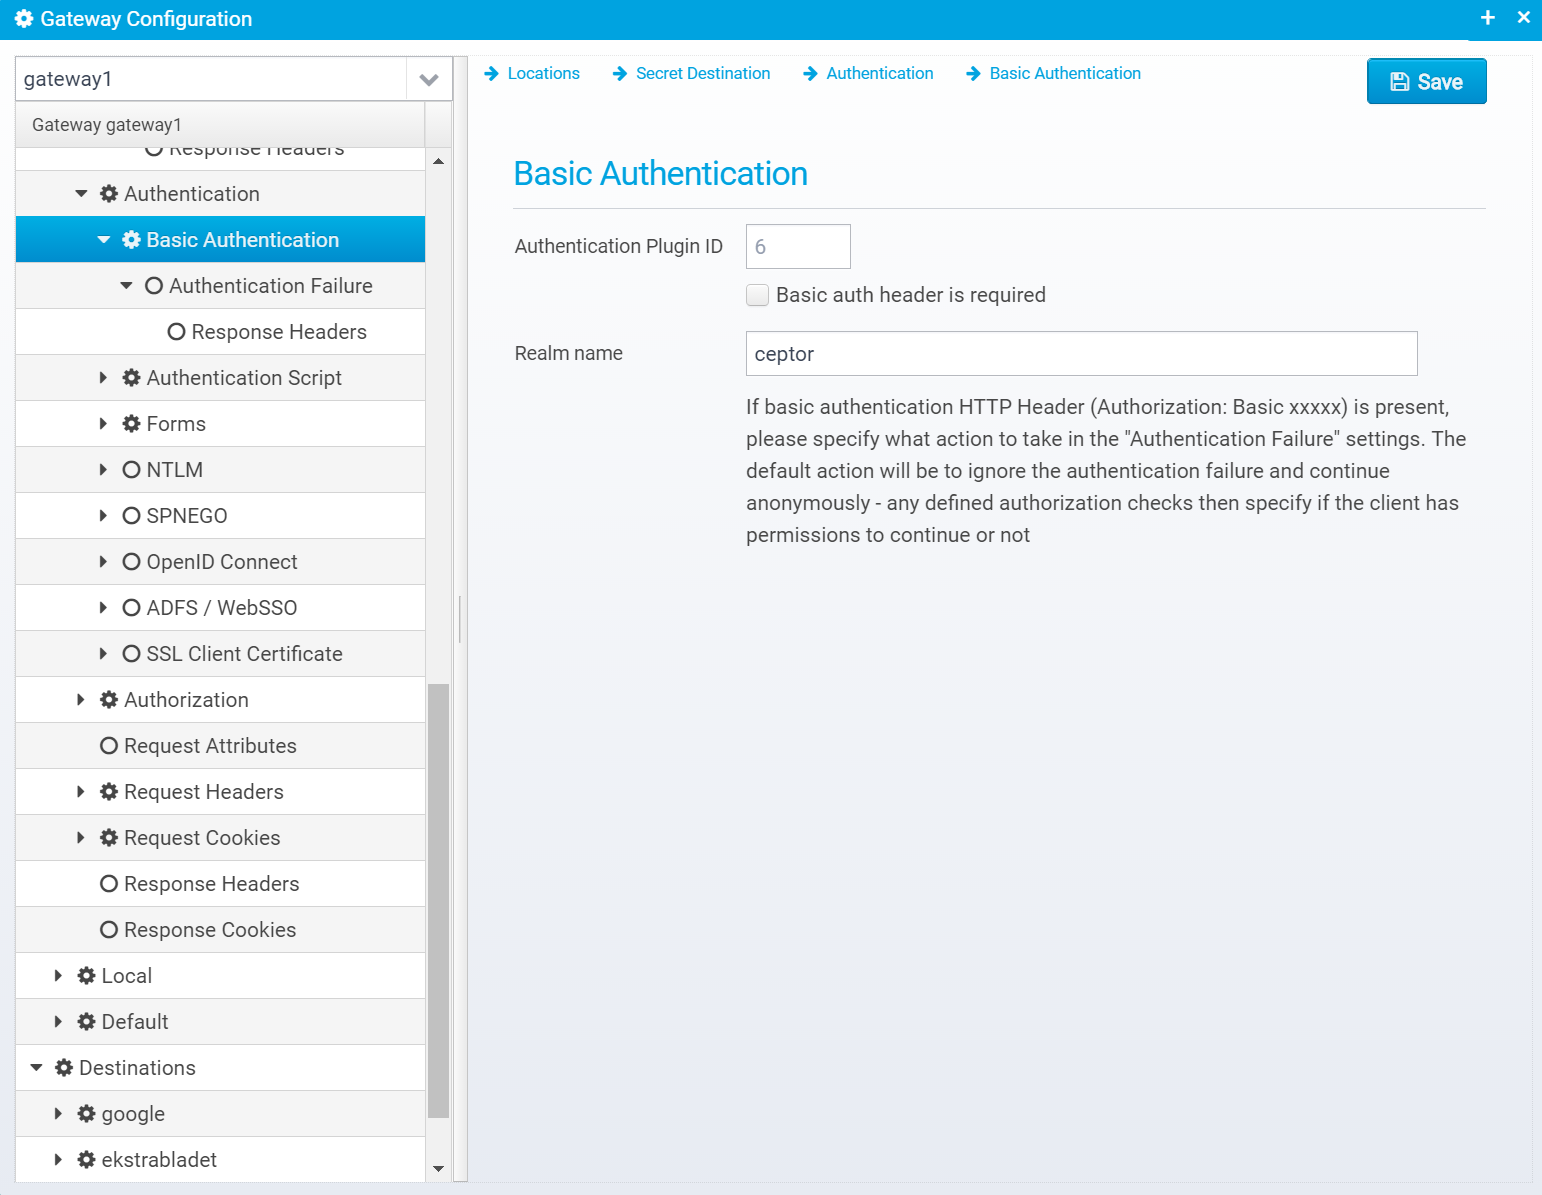
Basic Authentication
This screen is available if the authentication plugin "AuthenticatorBasicAuth" is selected.
Basic auth configuration is stored in the JSON Object basicauth within the authentication object.
Basic Authentication
Authentication Plugin ID
Authentication Plugin ID to use when authenticating userid/password from basicauth HTTP Header.
An authentication plugin with the corresponding ID needs to be installed in the Ceptor Session Controller.
Default: 6
JSON key: authenticationplugin
Basic auth header is required
If checked, basic authentication header is required to be present - if not present, 401 is sent back with WWW-Authenticate set to Basic with the configured realm name
Default: false
JSON key: required
Realm name
Name of basicauth realm to send back in 401 error if required and not present.
Default: secure
JSON key: realm
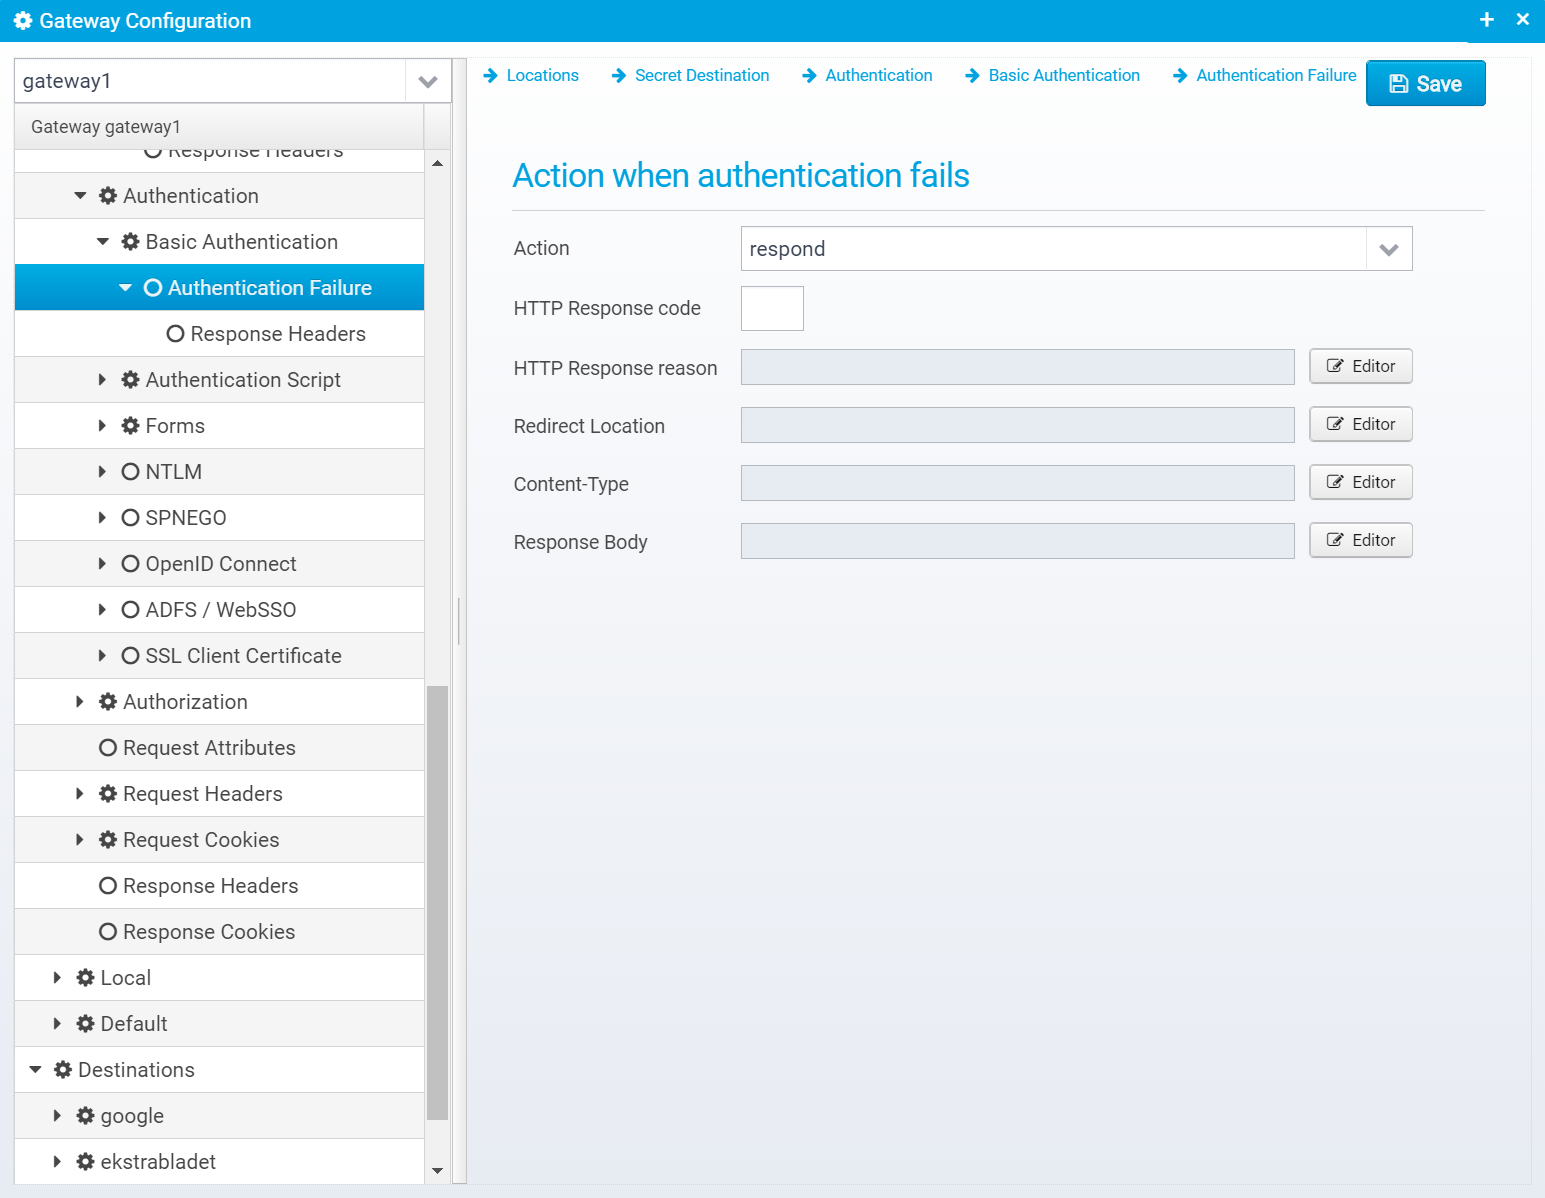
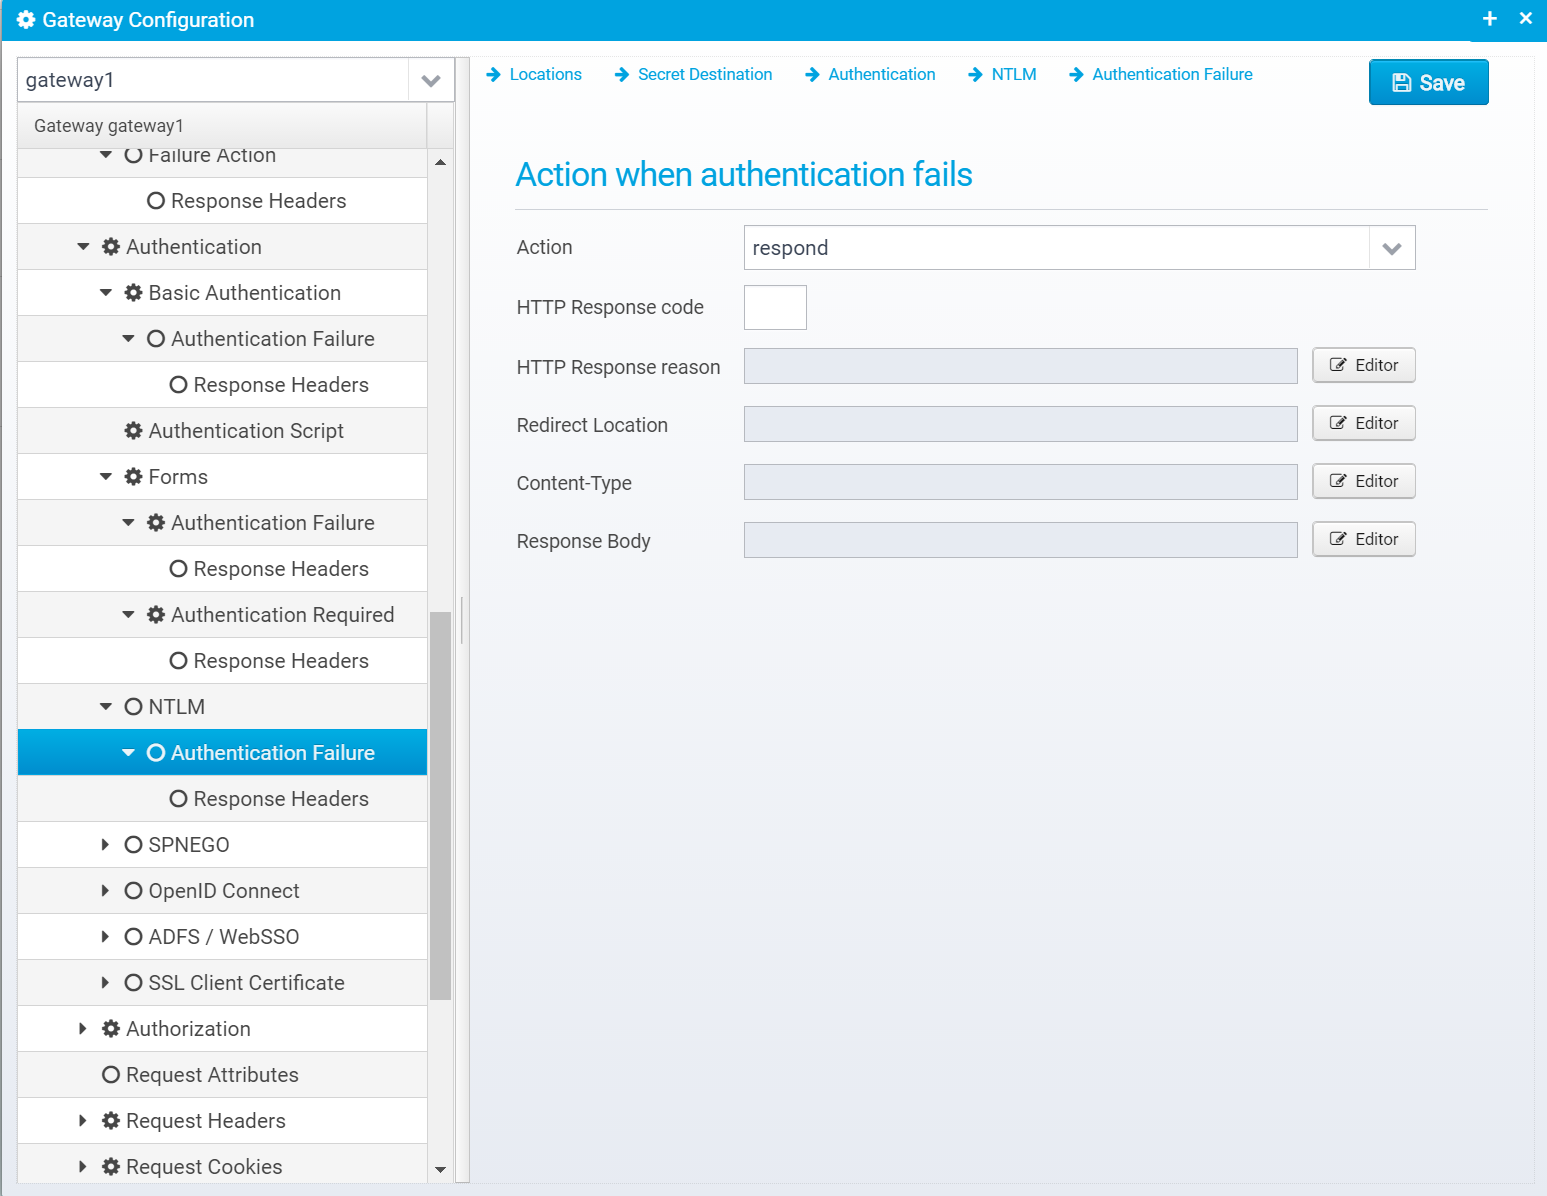
Authentication Failure
Configuration is stored in the JSON Object failure within the basicauth object.
Action
Action to take if authentication fails. continue=go on without authenticating, respond=respond with configured response or redirect
If action is set to RESPOND, then a response will be sent to the client with the information below.
Note that Scripts and Macros can be used to specify these values dynamically based upon request content.
Canned Response
Specify the name of a "canned" response here to reuse it - when set, the response sent back will be the one defined in the canned response - if any other values are specified here, HTTP response code, reason etc. then these values overwrite what was specified in the canned response. Any headers defined will complement the ones specified for the canned response.
Default: none
JSON key: response.name
HTTP Response code
HTTP Response code to send back to client.
Default: 500
JSON key: response.status
HTTP Response reason
HTTP response reason text
Default: No additional information
JSON key: response.reason
Redirect Location
Response Redirect Location URL - if set, a redirect will be sent instead of a normal response, the Location header in the response will be set to this value.
Default: none
JSON key: response.redirect
Content-Type
HTTP Response content-type
Default: none
JSON key: response.contenttype
Response Body
Response body contents
Default: none
JSON key: response.body
Response Headers
Response headers can also be added to the response, if any are specified, they are in an JSON array called response.headers within the failure JSON object.
You can add headers by clicking "Add", then you get a popup where you can set the name and value of the header.
Once created, they are added to the JSON Array response.headers within the failure JSON object, as a new object with the attributes name and value set to the entered name and value.
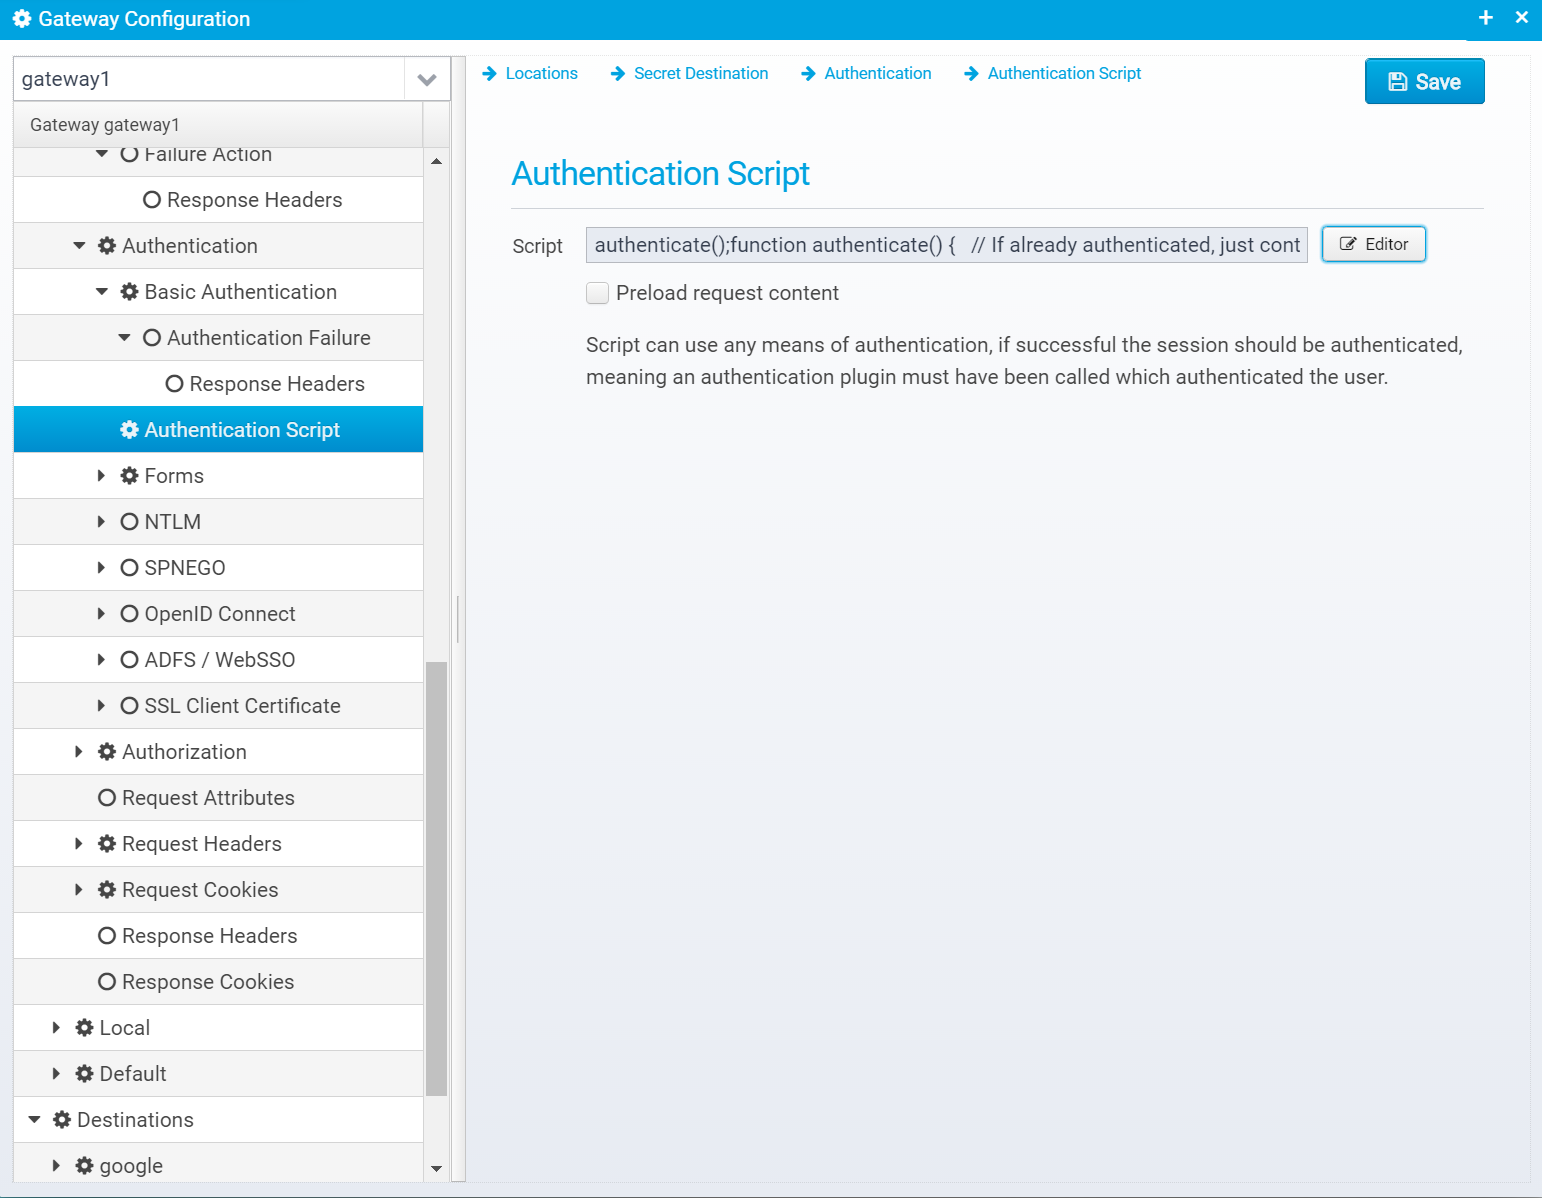
Authentication Script
This screen is available if the authentication plugin "AuthenticatorScript" is selected.
Configuration is stored in the JSON Object script within the authentication object.
Authentication Script
Script
Authentication Script to execute - must return SUCCESS, RESPOND or CONTINUE
See Plugins#AuthenticatorScript for an example script.
Default: none
JSON key: authentication.script
Preload request content
If checked, request content/body will be preloaded before the script is called.
Default: false
JSON key: content.preload
Forms
This screen is available if the authentication plugin "AuthenticatorForms" is selected.
Configuration is stored in the JSON Object forms within the authentication object.
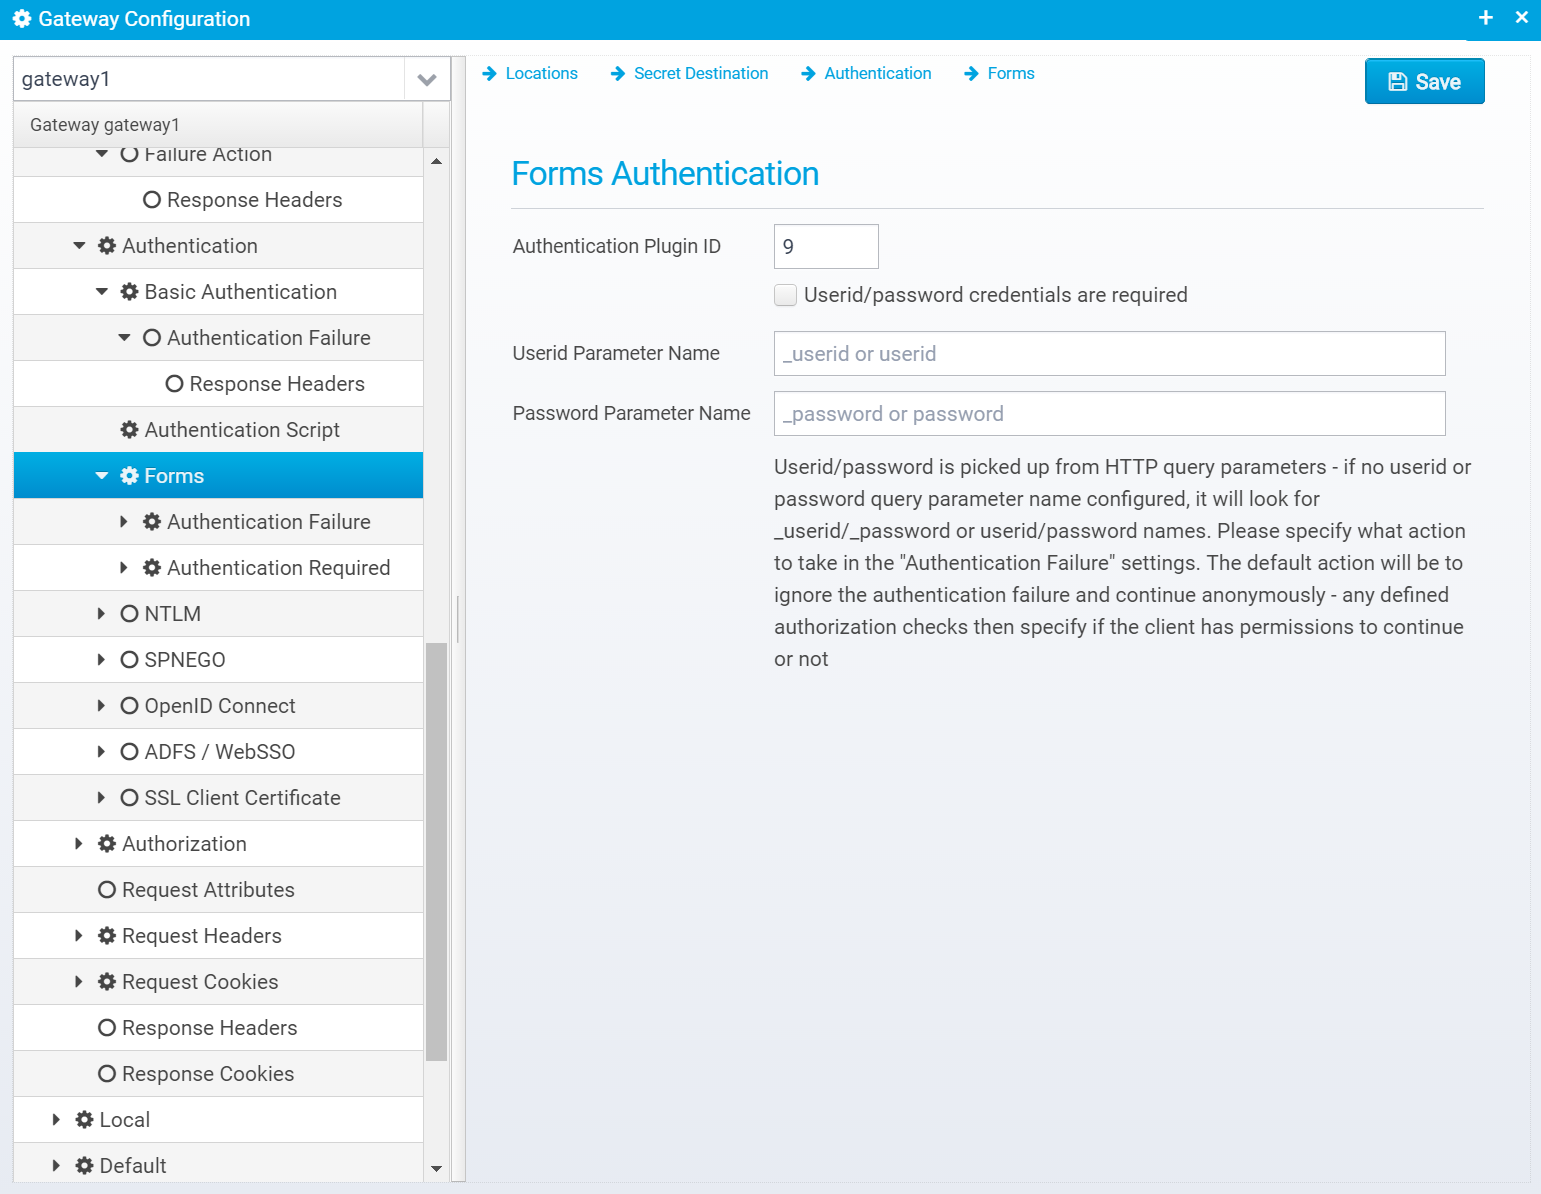
Forms Authentication
Authentication Plugin ID
Authentication Plugin ID to use when authenticating userid/password from HTTP query or POST parameters.
Note that a corresponding authentication plugin needs to be installed in the Ceptor Session Controller
Default: 6
JSON key:authenticationplugin
Userid/password credentials are required
If checked, userid/password is required to be present - if not present, the required/redirect action is performed - if that is not configured, 403 is sent back.
Default: false
JSON key: required
Userid Parameter Name
Name of query/post parameter containing userid, if not set defaults to userid or _userid
Default: userid or _userid
JSON key: param.userid
Password Parameter Name
Name of query/post parameter containing password, if not set defaults to password or _password
Default: password or _password
JSON key: param.password
Authentication Failure
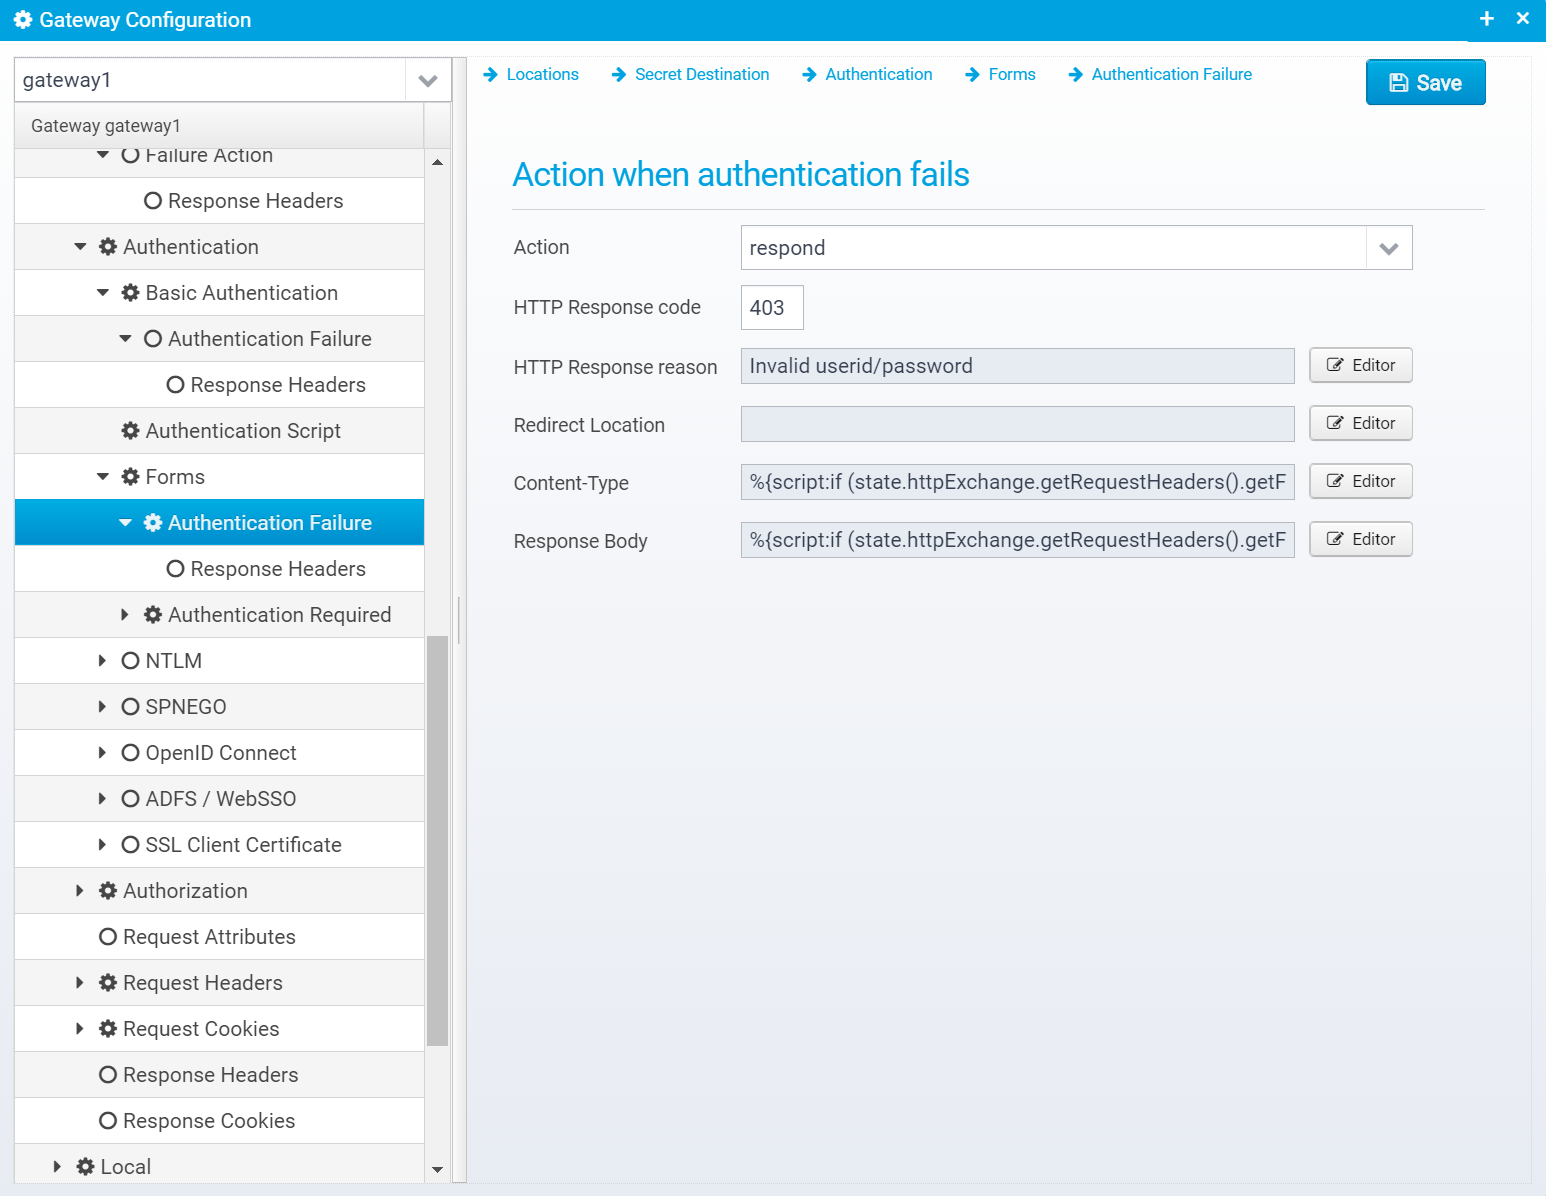
Configuration is stored in the JSON Object failure within the forms object.
Note that you can use scripts customize the content-type and response body according to the input - in this example, HTML or JSON is sent back depending on what the input was:
%{script:if (state.httpExchange.getRequestHeaders().getFirst('Content-Type') == 'application/json') 'application/json'; else 'text/html';}
%{script:if (state.httpExchange.getRequestHeaders().getFirst('Content-Type') == 'application/json') '{"error":"access.denied"\}'; else '<html><head><title>No access</title><body><h1>Invalid userid/password</h1></body></html>';}
Action
Action to take if authentication fails. continue=go on without authenticating, respond=respond with configured response or redirect
If action is set to RESPOND, then a response will be sent to the client with the information below.
Note that Scripts and Macros can be used to specify these values dynamically based upon request content.
Canned Response
Specify the name of a "canned" response here to reuse it - when set, the response sent back will be the one defined in the canned response - if any other values are specified here, HTTP response code, reason etc. then these values overwrite what was specified in the canned response. Any headers defined will complement the ones specified for the canned response.
Default: none
JSON key: response.name
HTTP Response code
HTTP Response code to send back to client.
Default: 500
JSON key: response.status
HTTP Response reason
HTTP response reason text
Default: No additional information
JSON key: response.reason
Redirect Location
Response Redirect Location URL - if set, a redirect will be sent instead of a normal response, the Location header in the response will be set to this value.
Default: none
JSON key: response.redirect
Content-Type
HTTP Response content-type
Default: none
JSON key: response.contenttype
Response Body
Response body contents
Default: none
JSON key: response.body
Response Headers
Response headers can also be added to the response, if any are specified, they are in an JSON array called response.headers within the failure JSON object.
You can add headers by clicking "Add", then you get a popup where you can set the name and value of the header.
Once created, they are added to the JSON Array response.headers within the failure JSON object, as a new object with the attributes name and value set to the entered name and value.
Authentication Required
You can specify what action to take if authentication is required, but not provided - usually you want to redirect to another page where authentication can take place.
You can use forms authentication as a way of redirecting to a separate page if no user is authenticating, but setting required to true, and setting the authentication required action to redirect to a login page.
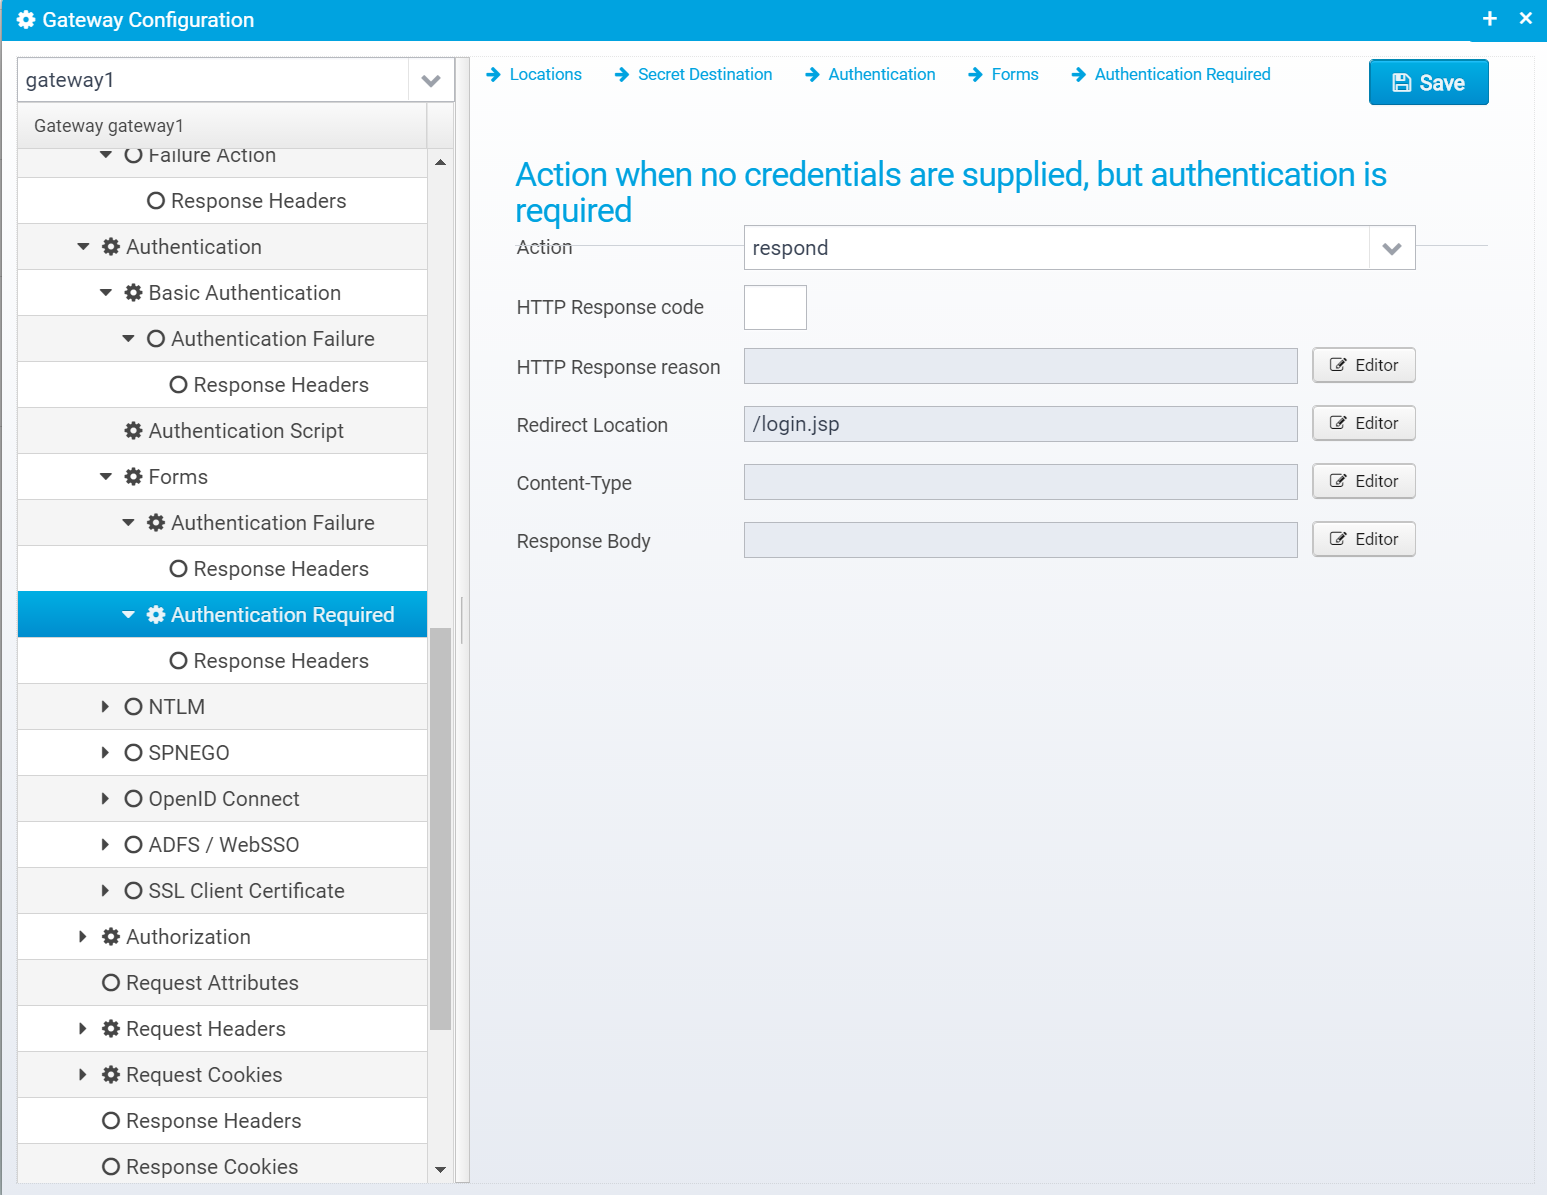
Configuration is stored in the JSON Object redirect within the forms object.
Action
Action to take if authentication is required, but not provided. continue=go on without authenticating, respond=respond with configured response or redirect
If action is set to RESPOND, then a response will be sent to the client with the information below.
Note that Scripts and Macros can be used to specify these values dynamically based upon request content.
Canned Response
Specify the name of a "canned" response here to reuse it - when set, the response sent back will be the one defined in the canned response - if any other values are specified here, HTTP response code, reason etc. then these values overwrite what was specified in the canned response. Any headers defined will complement the ones specified for the canned response.
Default: none
JSON key: response.name
HTTP Response code
HTTP Response code to send back to client.
Default: 500
JSON key: response.status
HTTP Response reason
HTTP response reason text
Default: No additional information
JSON key: response.reason
Redirect Location
Response Redirect Location URL - if set, a redirect will be sent instead of a normal response, the Location header in the response will be set to this value.
Default: none
JSON key: response.redirect
Content-Type
HTTP Response content-type
Default: none
JSON key: response.contenttype
Response Body
Response body contents
Default: none
JSON key: response.body
Response Headers
Response headers can also be added to the response, if any are specified, they are in an JSON array called response.headers within the redirect JSON object.
You can add headers by clicking "Add", then you get a popup where you can set the name and value of the header.
Once created, they are added to the JSON Array response.headers within the failure JSON object, as a new object with the attributes name and value set to the entered name and value.
NTLM
NTLM Authentication is supported, but only using the older deprecated NTLMv1 protocol - this is a requirement since the way NTLM works in Ceptor is that the Gateway or Dispatcher intercepts negotiation and forwards it to the domain controller/workstation which validates the ntlm login. This is only possible with NTLMv1 and not with NTLMv2 so with newer servers you should switch to using SPNEGO instead of NTLM.
This screen is available if the authentication plugin "AuthenticatorNTLM" is selected.
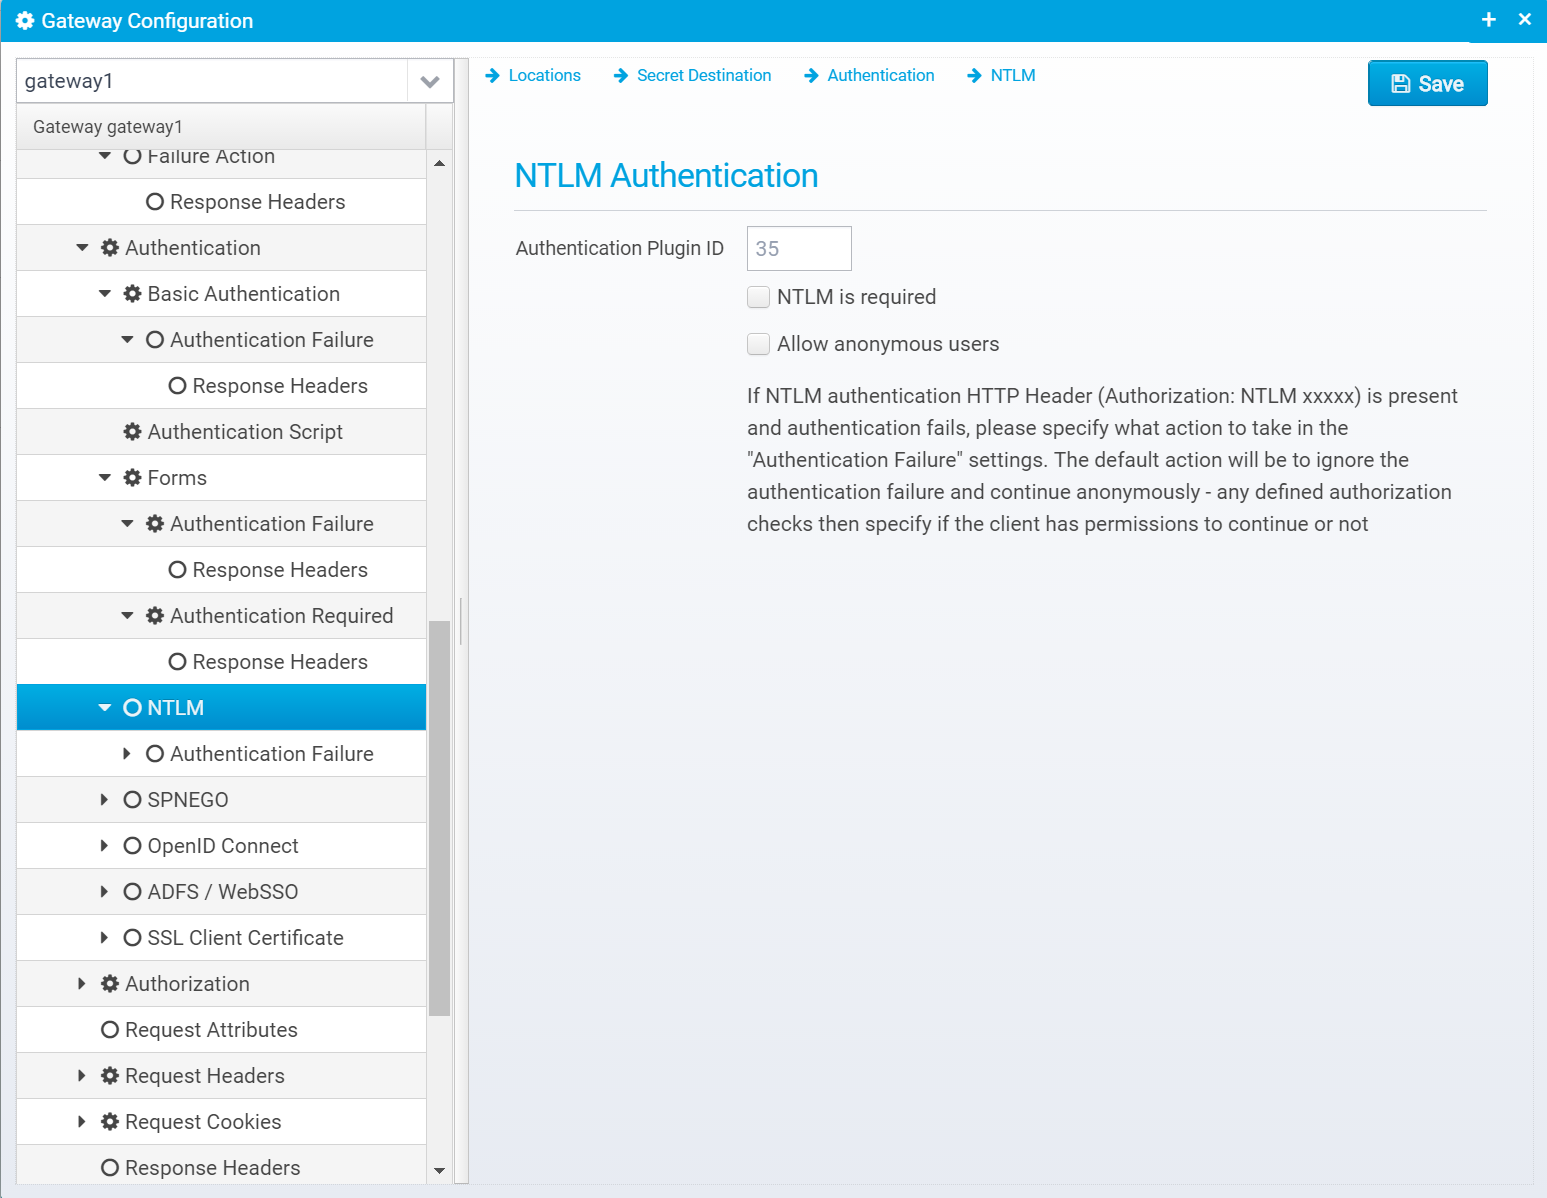
Configuration is stored in a JSON Object called ntlm inside the authentication object.
NTLM Authentication
Authentication Plugin ID
Authentication Plugin ID to use when authenticating using NTLM.
The matching plugin needs to be installed in the Ceptor Session Controller
Default: 35
JSON key: authenticationplugin
NTLM is required
If checked, NTLM authentication is required - if not present, 401 is sent back with WWW-Authenticate set to NTLM
Default is false
JSON key: required
Allow anonymous users
If checked, and NTLM authentication has previously failed, users are allowed to continue as anonymous
Default: false
JSON key: allow.anonymous
Authentication Failure
Configuration is stored in the JSON Object failure within the ntlm object.
Action
Action to take if authentication fails. continue=go on without authenticating, respond=respond with configured response or redirect
If action is set to RESPOND, then a response will be sent to the client with the information below.
Note that Scripts and Macros can be used to specify these values dynamically based upon request content.
Canned Response
Specify the name of a "canned" response here to reuse it - when set, the response sent back will be the one defined in the canned response - if any other values are specified here, HTTP response code, reason etc. then these values overwrite what was specified in the canned response. Any headers defined will complement the ones specified for the canned response.
Default: none
JSON key: response.name
HTTP Response code
HTTP Response code to send back to client.
Default: 500
JSON key: response.status
HTTP Response reason
HTTP response reason text
Default: No additional information
JSON key: response.reason
Redirect Location
Response Redirect Location URL - if set, a redirect will be sent instead of a normal response, the Location header in the response will be set to this value.
Default: none
JSON key: response.redirect
Content-Type
HTTP Response content-type
Default: none
JSON key: response.contenttype
Response Body
Response body contents
Default: none
JSON key: response.body
Response Headers
Response headers can also be added to the response, if any are specified, they are in an JSON array called response.headers within the failure JSON object.
You can add headers by clicking "Add", then you get a popup where you can set the name and value of the header.
Once created, they are added to the JSON Array response.headers within the failure JSON object, as a new object with the attributes name and value set to the entered name and value.
SPNEGO
This screen is available if the authentication plugin "AuthenticatorSPNEGO" is selected.

Configuration is stored in the JSON Object spnego inside the authentication object.
SPNEGO Authentication
Authentication Plugin ID
Authentication Plugin ID to use when authenticating using SPNEGO
Default is 26
JSON key: authenticationplugin
SPNEGO is required
If checked, SPNEGO authentication is required - if not present, 401 is sent back with WWW-Authenticate set to Negotiate
Default: false
JSON key: required
Allow anonymous users
If checked, and SPNEGO/NTLM authentication has previously failed, users are allowed to continue as anonymous
Default: false
JSON key: allow.anonymous
Allow fallback to NTLM
If checked, and SPNEGO/NTLM authentication has previously failed, users are allowed to continue as anonymous
Default: true
JSON key: allow.ntlm.fallback
For SPNEGO / Kerberos authentication to work you need two system properties in the gateway pointing to krb5.conf and login.conf, e.g.
-Djava.security.krb5.conf=${ceptor.home}/config/spnego/krb5.conf
-Djava.security.auth.login.config=${ceptor.home}/config/spnego/login.conf
Authentication Failure
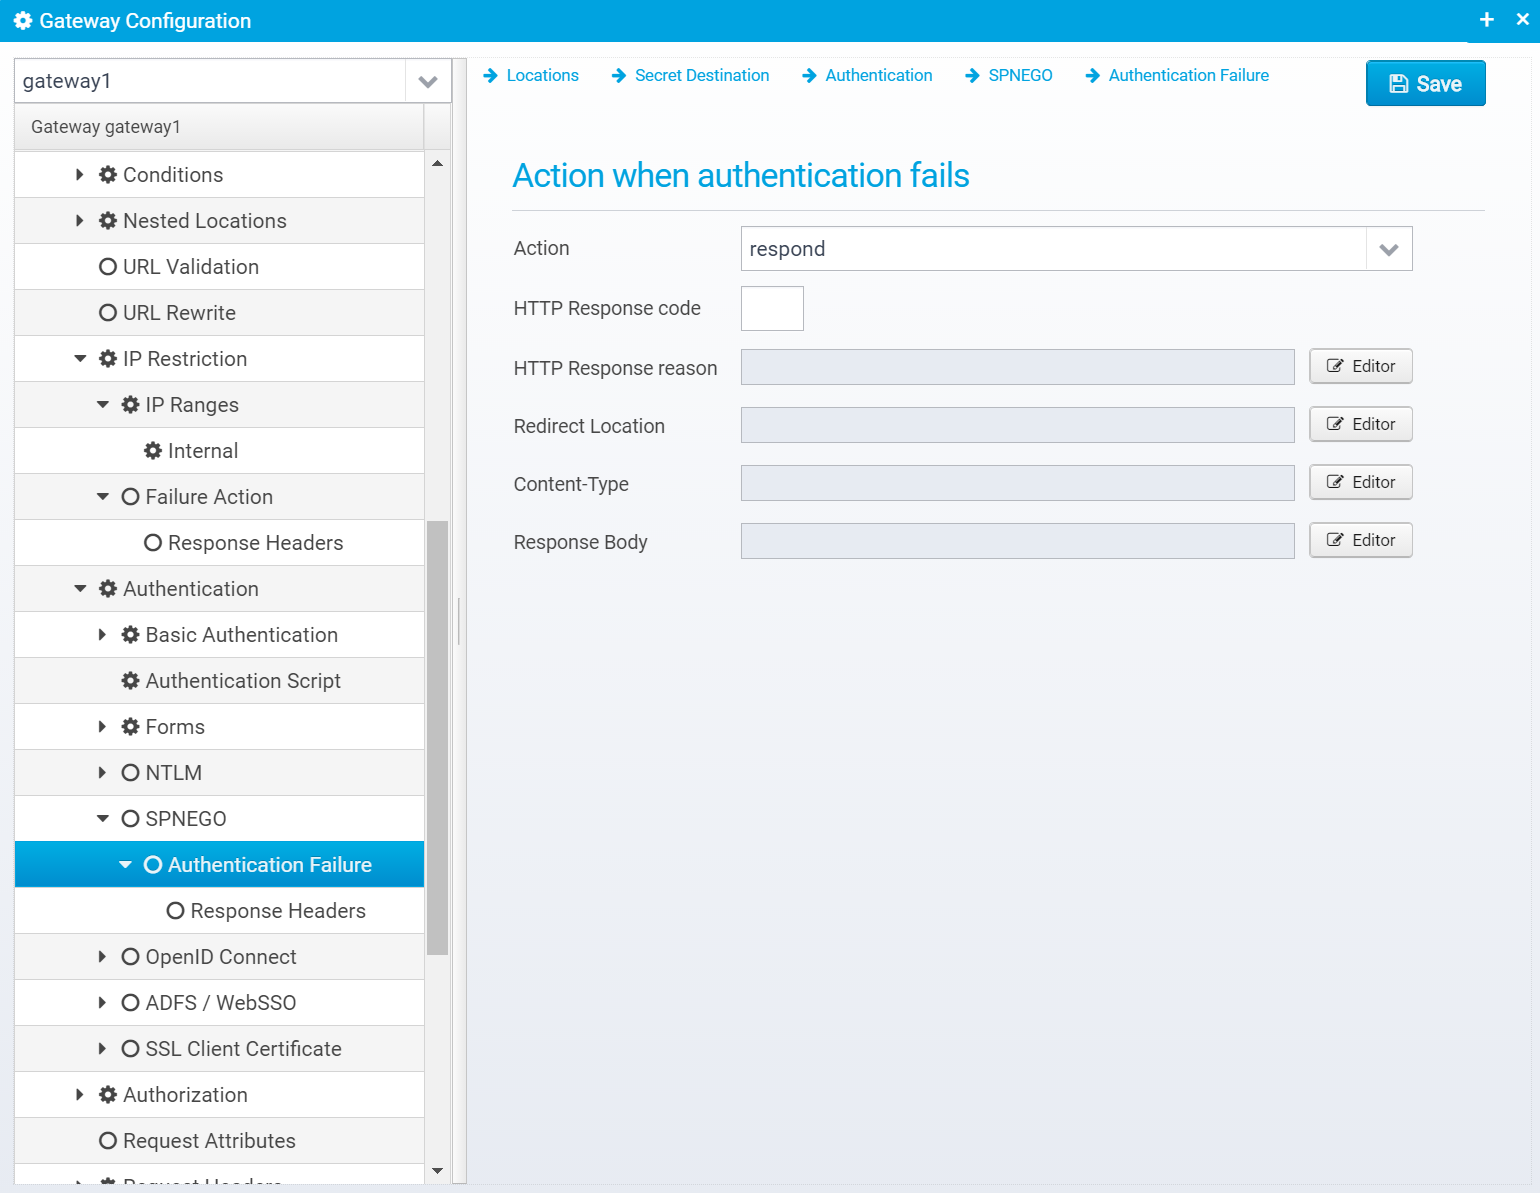
Configuration is stored in the JSON Object failure within the spnego object.
Action
Action to take if authentication fails. continue=go on without authenticating, respond=respond with configured response or redirect
If action is set to RESPOND, then a response will be sent to the client with the information below.
Note that Scripts and Macros can be used to specify these values dynamically based upon request content.
Canned Response
Specify the name of a "canned" response here to reuse it - when set, the response sent back will be the one defined in the canned response - if any other values are specified here, HTTP response code, reason etc. then these values overwrite what was specified in the canned response. Any headers defined will complement the ones specified for the canned response.
Default: none
JSON key: response.name
HTTP Response code
HTTP Response code to send back to client.
Default: 500
JSON key: response.status
HTTP Response reason
HTTP response reason text
Default: No additional information
JSON key: response.reason
Redirect Location
Response Redirect Location URL - if set, a redirect will be sent instead of a normal response, the Location header in the response will be set to this value.
Default: none
JSON key: response.redirect
Content-Type
HTTP Response content-type
Default: none
JSON key: response.contenttype
Response Body
Response body contents
Default: none
JSON key: response.body
Response Headers
Response headers can also be added to the response, if any are specified, they are in an JSON array called response.headers within the failure JSON object.
You can add headers by clicking "Add", then you get a popup where you can set the name and value of the header.
Once created, they are added to the JSON Array response.headers within the failure JSON object, as a new object with the attributes name and value set to the entered name and value.
OpenID Connect
This screen is available if the authentication plugin "AuthenticatorOpenIDConnect" is selected.
Configuration is stored in the JSON Object openidconnect inside the authentication object.
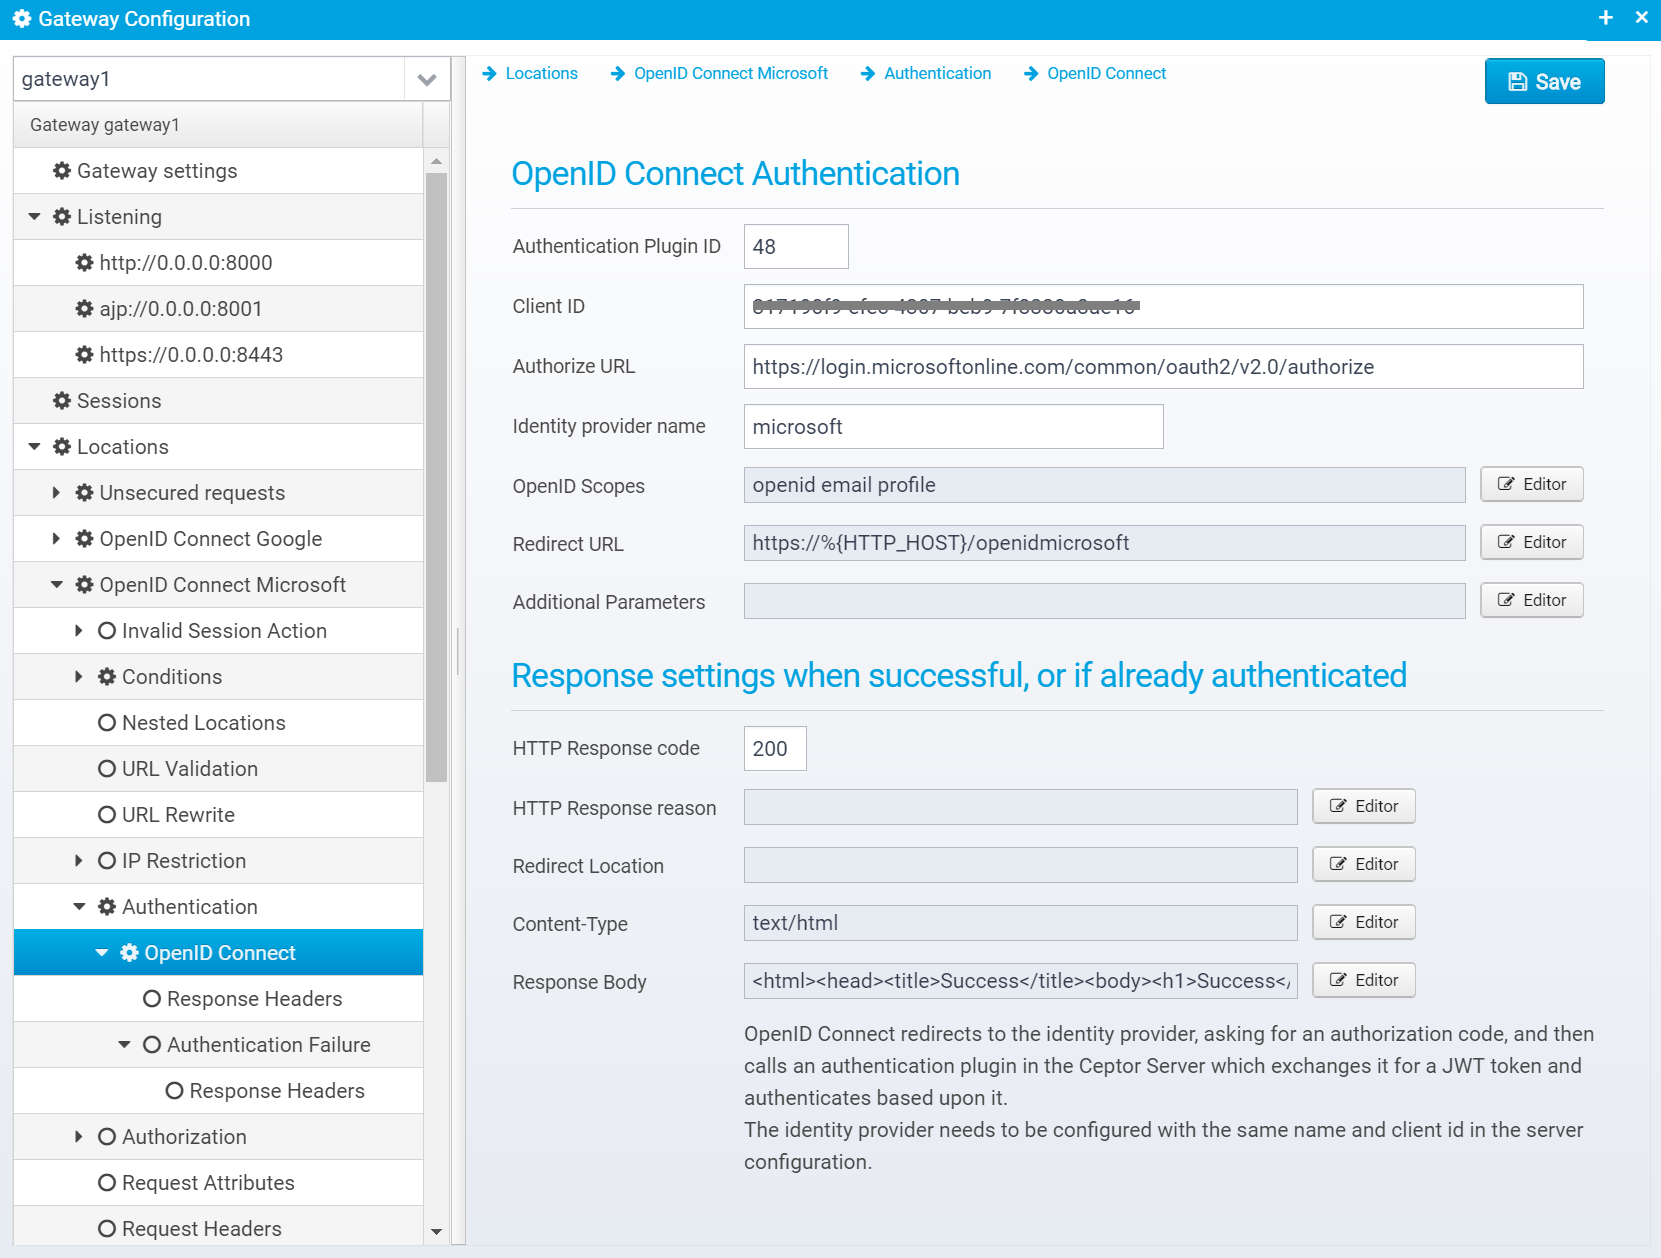
Using the OpenID Connect Authentication plugin, you can use the authorization code flow of the openid connect standard to redirect to an OpenID compliant Identity Provider, such as Google or Microsoft, login, and get redirected back with an authorization code.
The JWT / OpenID Connect authentication plugin installed in the Ceptor Session Controller will then take care of exchanging the authorization code for an identity token, validating it and authenticating the user based upon the contents.
OpenID Connect Authentication
Authentication Plugin ID
Authentication Plugin ID to use when authenticating using OpenID Connect
Default is 48
JSON key: authenticationplugin
Client ID
Client ID - identifies us to the identity provider
Default: blank
JSON key: client.id
Authorize URL
URL to redirect to ask for authentication - when user is authenticated, identity provider will get redirected back to the redirecturl with the authorization code.
Default: blank
JSON key: authorize.url
Identity provider name
Must match a known identity provider name in the session controller on the server, where the same client_id and an additional client_secret/token url needs to be configured.
Default: null
JSON key: identityprovider.name
OpenID Scopes
List of space separated OpenID Connect scope names - informs the identity provider what information we wish him to provide about the user.
Usually "openid profile email"
Default: none
JSON key: scope
Redirect URL
URL that the identity provider should redirect the user back to after authenticating
Default: none
JSON key: redirecturl
Additional Parameters
List of additional query parameters to append to the request, separated by & - e.g. prompt=consent&access_type=online
Default: none
JSON key: parameters
Response settings when successful, or if already authenticated
Canned Response
Specify the name of a "canned" response here to reuse it - when set, the response sent back will be the one defined in the canned response - if any other values are specified here, HTTP response code, reason etc. then these values overwrite what was specified in the canned response. Any headers defined will complement the ones specified for the canned response.
Default: none
JSON key: response.name
HTTP Response code
HTTP Response code to send back to client.
Default: 500
JSON key: response.status
HTTP Response reason
HTTP response reason text
Default: No additional information
JSON key: response.reason
Redirect Location
Response Redirect Location URL - if set, a redirect will be sent instead of a normal response, the Location header in the response will be set to this value.
Default: none
JSON key: response.redirect
Content-Type
HTTP Response content-type
Default: none
JSON key: response.contenttype
Response Body
Response body contents
Default: none
JSON key: response.body
Response Headers
Response headers can also be added to the response, if any are specified, they are in an JSON array called response.headers within the openidconnect JSON object.
You can add headers by clicking "Add", then you get a popup where you can set the name and value of the header.
Once created, they are added to the JSON Array response.headers within the openidconnect JSON object, as a new object with the attributes name and value set to the entered name and value.
Authentication Failure
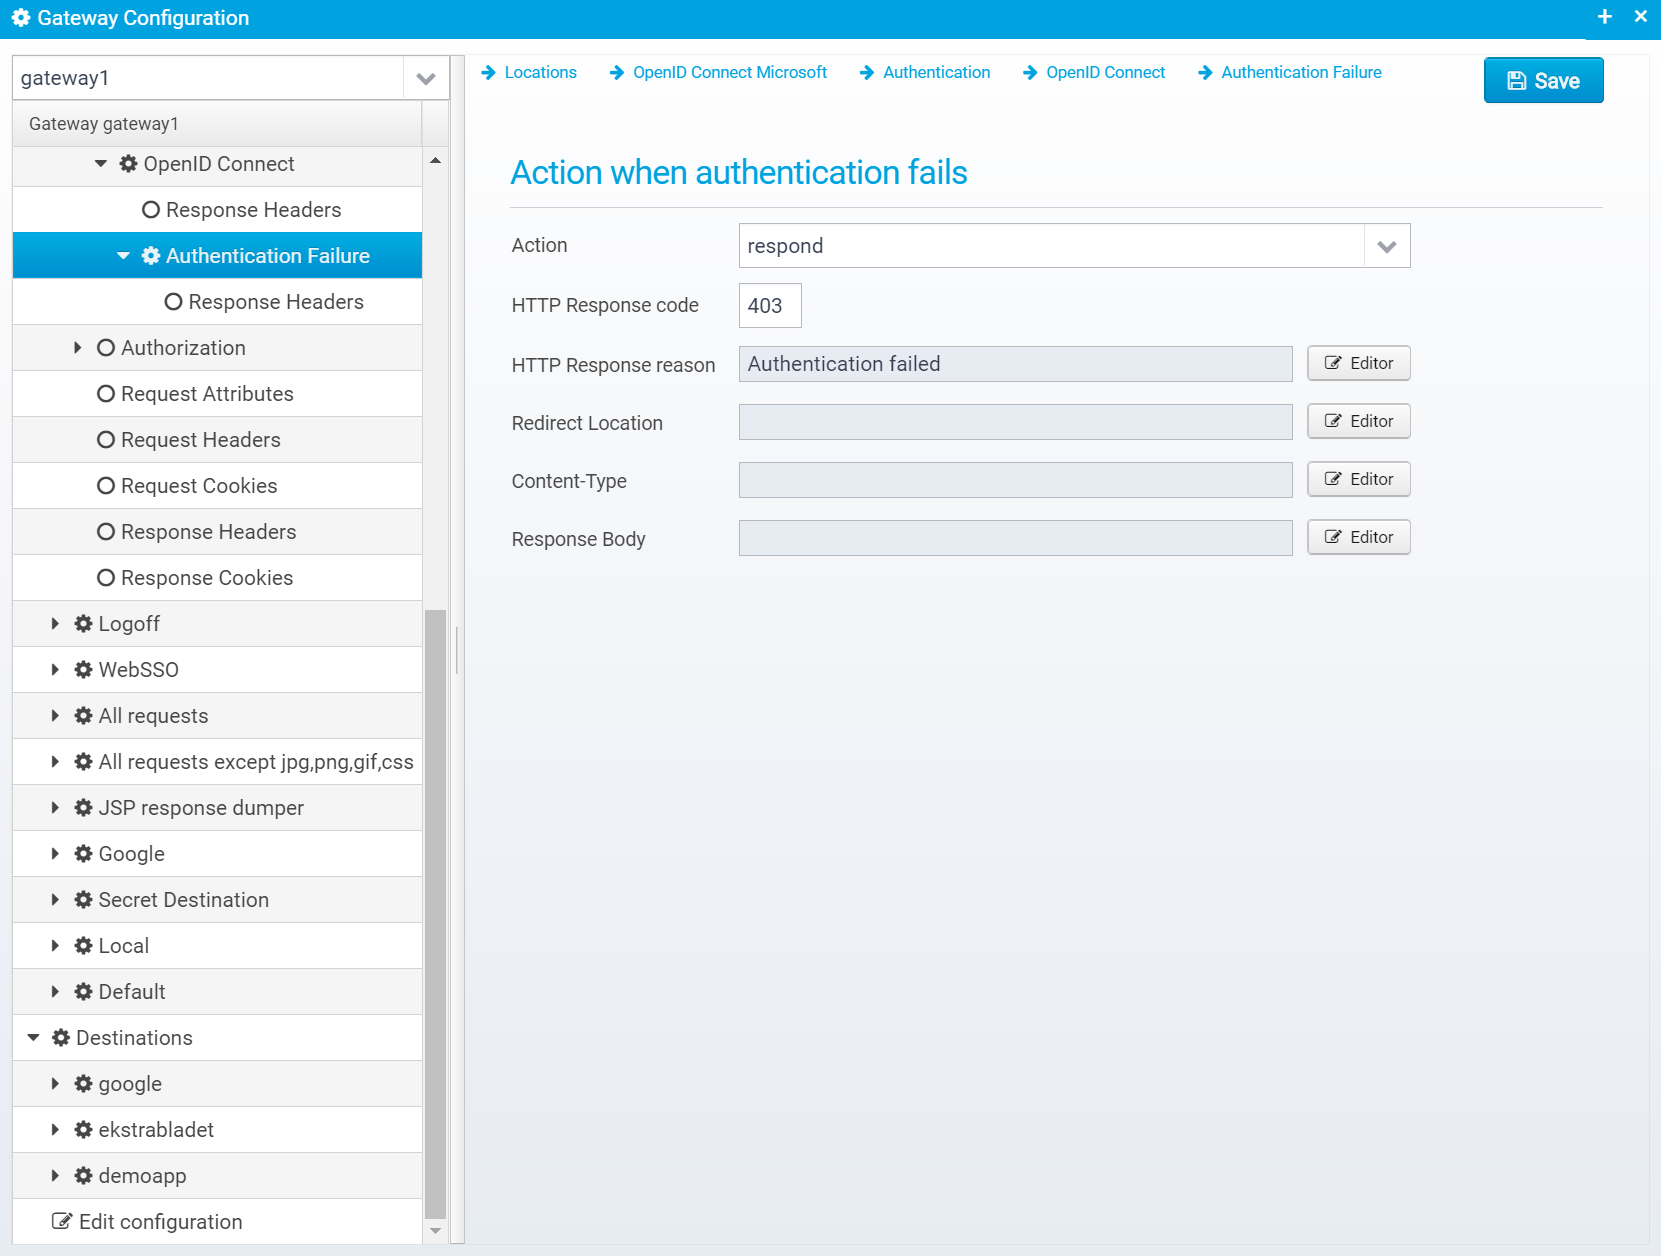
Configuration is stored in the JSON Object failure within the openidconnect object.
Action
Action to take if authentication fails. continue=go on without authenticating, respond=respond with configured response or redirect
If action is set to RESPOND, then a response will be sent to the client with the information below.
Note that Scripts and Macros can be used to specify these values dynamically based upon request content.
Canned Response
Specify the name of a "canned" response here to reuse it - when set, the response sent back will be the one defined in the canned response - if any other values are specified here, HTTP response code, reason etc. then these values overwrite what was specified in the canned response. Any headers defined will complement the ones specified for the canned response.
Default: none
JSON key: response.name
HTTP Response code
HTTP Response code to send back to client.
Default: 500
JSON key: response.status
HTTP Response reason
HTTP response reason text
Default: No additional information
JSON key: response.reason
Redirect Location
Response Redirect Location URL - if set, a redirect will be sent instead of a normal response, the Location header in the response will be set to this value.
Default: none
JSON key: response.redirect
Content-Type
HTTP Response content-type
Default: none
JSON key: response.contenttype
Response Body
Response body contents
Default: none
JSON key: response.body
Response Headers
Response headers can also be added to the response, if any are specified, they are in an JSON array called response.headers within the failure JSON object.
You can add headers by clicking "Add", then you get a popup where you can set the name and value of the header.
Once created, they are added to the JSON Array response.headers within the failure JSON object, as a new object with the attributes name and value set to the entered name and value.
ADFS / WebSSO
This screen is available if the authentication plugin "AuthenticatorWebSSO" is selected.
Configuration is stored in the JSON Object websso within the authentication object.
This authentication plugin supports both redirecting to configured SAML Identity Providers ( see Federations ) with generated SAML Request to ask them to authenticate a user, and it supports receiving SAML Responses from configured SAML Service Providers in order to let them request a SAML Response.
The following query/post parameters are supported for redirecting to SAML Service Providers:
- tokentype
Specify which token type to use, can be ws-trust, saml1 and saml2 - defaults to saml2. - binding
Specify binding, can be GET, redirect or POST - SAML Requestwill be sent with HTTP GET or POST request to the Service Provider URL depending on this parameter. Defaults to POST. - requestid
Optionally specify request ID to respond to. Defaults to none. - RelayState
If this parameter is present in the request along with a SAML Request, it is sent back in the POST request with the SAML Response
Advanced usage
Normally, federation can be initiated via a SAML Request present in the POST or Query parameter "SAMLRequest", but if you receive the SAML request from other sources, you can store it in the session in a state variable called "websso.samlrequest" -if no SAML request is provided as input, the authentication plugin will look in the session for this attribute and use it if present. It will be deleted after use.
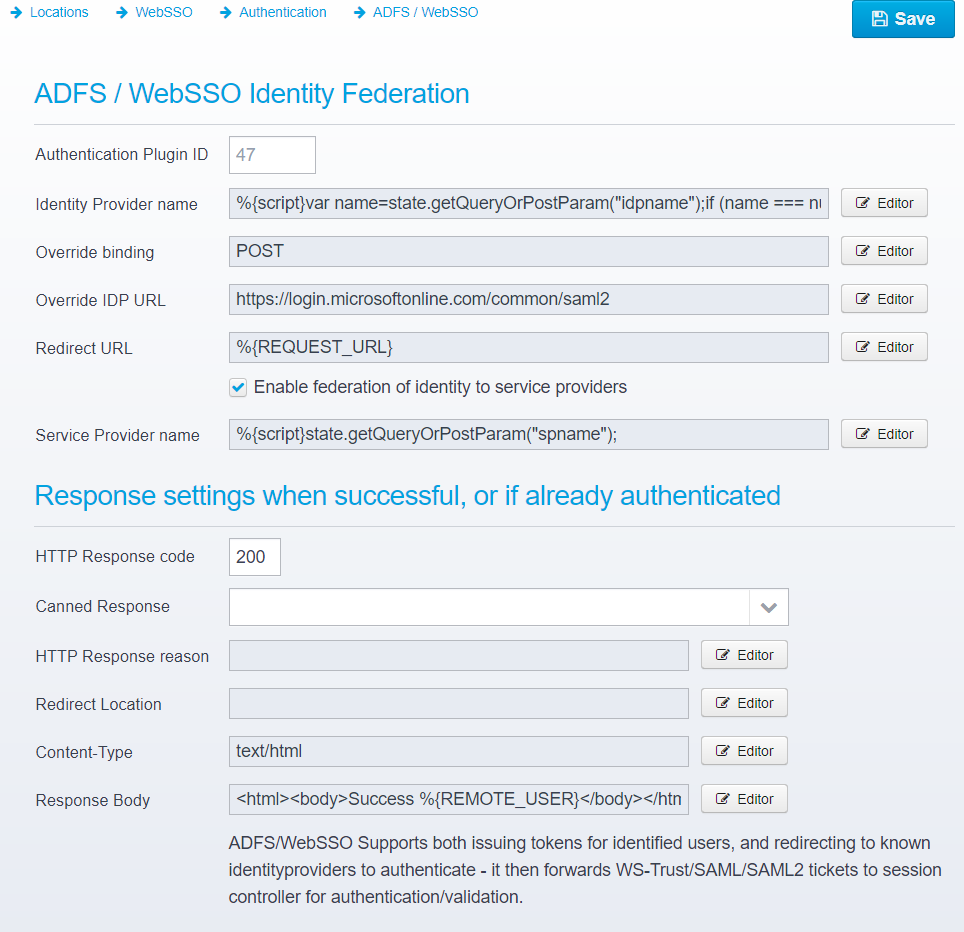
ADFS / WebSSO Identity Federation
Authentication Plugin ID
Authentication Plugin ID to use when authenticating using OpenID Connect
The corresponding authentication plugin must be configured in the Ceptor Session Controller
Default: 47
JSON key: authenticationplugin
Identity Provider name
Name of identity provider - must match name specified in session controller authentication plugin settings
Default: none
JSON key: identityprovider.name
To get the name from a query parameter, specify a script like this:
context.getQueryOrPostParam("idpname");
Requires minimum Ceptor v6.4.5 - with lower versions, the passive binding is the only supported one.
When using another site as Identity Provider, and Ceptor as Service Provider to that site, the following additional query/post parameters can be specified when calling the URL that triggers this plugin:
- binding
Specify binding, can be passive, redirect or POST - default is passive. - RelayState
If this parameter is present in the request, it is added to the request towards the Identity Provider. - signrequest
For redirect/POST binding, specify if SAML request should be signed or not - default is true. - encryptrequest
For redirect/POST binding, specify if SAML request should be encrypted or not - default is false.
For passive binding (which is the default), the redirect to the Identity Providers federation URL will be done, adding these query parameters:
- wa=wsignin1.0
- id=passive
- wtrealm=<identifier name>
- wreply=<return url>
- wct=<current timestamp>
- RelayState=<relayState input parameter if not empty>
For the passive binding, no SAML Request will be transmitted.
for redirect / GET binding, the redirect to the Identity Providers federation URL will be done, adding the following query parameters:
- SAMLRequest=<deflated SAML request, base64 encoded>
- RelayState=<relayState input parameter if not empty>
Note that the SAML request will be signed/encrypted according to the query/POST input parameters signrequest and encryptrequest.
for POST binding, a form is return that autosubmits sending a POST requst to the Identity Providers federation URL with the following parameters:
- SAMLRequest=<base64 encoded SAML request>
- RelayState=<relayState input parameter if not empty>
Note that the SAML request will be signed/encrypted according to the query/POST input parameters signrequest and encryptrequest.
Override binding
Override the binding - normally if sending the request to a service provider, the binding is POST - in that case, either POST or redirect is supported.
If using an identity provider (if Identity Provider name is set and service provider name is not) then the binding can be set to passive/GET/POST as specified above.
Note that if this property is read, the query/POST parameter "binding" is not used.
Default: none
JSON key: override.binding
Override IDP URL
The URL of the identity provider is normally specified in the Federations configuration for each Identity Provider - by default that URL is used, but you can override the URL by specifying another here.
Default: none (uses Identity Provider URL from Federations configuration)
JSON key: override.identityprovider.url
Redirect URL
URL that the identity provider should redirect the user back to after authenticating
Default: none
JSON key: redirecturl
Enable federation of identity to service providers
When enabled, an identified users identity can be federated to a service provider, and a serviceprovider can send a SAML request to us to ask for identity
Default: true
JSON key: federation.enabled
This authentication plugin can be used both when using Ceptor as a relying party / service provider and when using Ceptor as an Identity Provider where the user is already authenticated.
When Ceptor is an Identity Provider, the plugin receives and processes a SAML Request for authentication.
Service Provider name
Name of serviceprovider to federate to - must match name specified in session controller authentication plugin settings.
By using a script such as
context.getQueryOrPostParam("spname");
you can allow the name to be specified on a query parameter.
You can use this authentication plugin to obtain federation metadata, assuming the ADFS/WebSSO Authentication plugin in the session controller has been configured with metadata templates.
You do this by adding the query parameter metadatasigned to download a signed version of the matadata, or metadataunsigned to obtain an unsigned version of the metadata.
Default:none
JSON key: serviceprovider.name
Response settings when successful, or if already authenticated
Canned Response
Specify the name of a "canned" response here to reuse it - when set, the response sent back will be the one defined in the canned response - if any other values are specified here, HTTP response code, reason etc. then these values overwrite what was specified in the canned response. Any headers defined will complement the ones specified for the canned response.
Default: none
JSON key: response.name
HTTP Response code
HTTP Response code to send back to client.
Default: 500
JSON key: response.status
HTTP Response reason
HTTP response reason text
Default: No additional information
JSON key: response.reason
Redirect Location
Response Redirect Location URL - if set, a redirect will be sent instead of a normal response, the Location header in the response will be set to this value.
Default: none
JSON key: response.redirect
Content-Type
HTTP Response content-type
Default: none
JSON key: response.contenttype
Response Body
Response body contents
Default: none
JSON key: response.body
Response Headers
Response headers can also be added to the response, if any are specified, they are in an JSON array called response.headers within the websso JSON object.
You can add headers by clicking "Add", then you get a popup where you can set the name and value of the header.
Once created, they are added to the JSON Array response.headers within the openidconnect JSON object, as a new object with the attributes name and value set to the entered name and value.
Authentication Failure
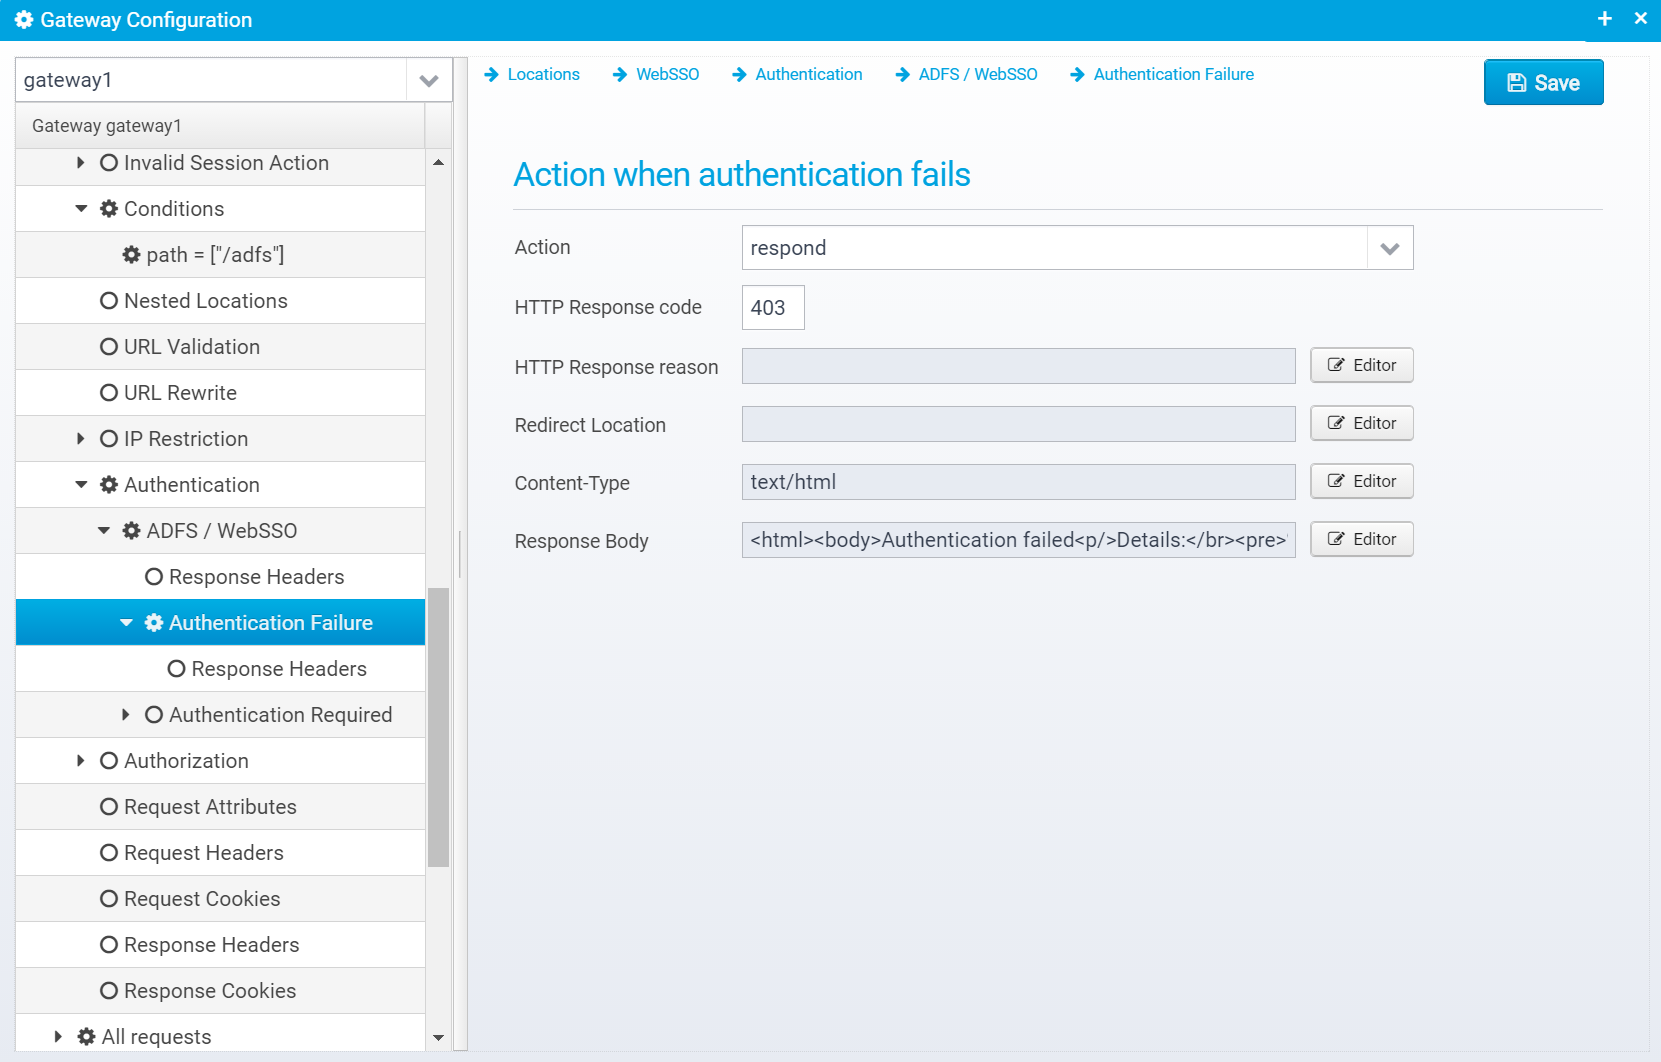
Configuration is stored in the JSON Object failure within the websso object.
Action
Action to take if authentication fails. continue=go on without authenticating, respond=respond with configured response or redirect
If action is set to RESPOND, then a response will be sent to the client with the information below.
Note that Scripts and Macros can be used to specify these values dynamically based upon request content.
Canned Response
Specify the name of a "canned" response here to reuse it - when set, the response sent back will be the one defined in the canned response - if any other values are specified here, HTTP response code, reason etc. then these values overwrite what was specified in the canned response. Any headers defined will complement the ones specified for the canned response.
Default: none
JSON key: response.name
HTTP Response code
HTTP Response code to send back to client.
Default: 500
JSON key: response.status
HTTP Response reason
HTTP response reason text
Default: No additional information
JSON key: response.reason
Redirect Location
Response Redirect Location URL - if set, a redirect will be sent instead of a normal response, the Location header in the response will be set to this value.
Default: none
JSON key: response.redirect
Content-Type
HTTP Response content-type
Default: none
JSON key: response.contenttype
Response Body
Response body contents
By using macros such as the ones below, you can add information about the failure to the response:
<html><body>Authentication failed<p/>
Details:</br>
<pre>
%{htmlencode:EXCEPTION_LOG}
</pre>
</body></html>
Default: none
JSON key: response.body
Response Headers
Response headers can also be added to the response, if any are specified, they are in an JSON array called response.headers within the failure JSON object.
You can add headers by clicking "Add", then you get a popup where you can set the name and value of the header.
Once created, they are added to the JSON Array response.headers within the failure JSON object, as a new object with the attributes name and value set to the entered name and value.
Authentication Required
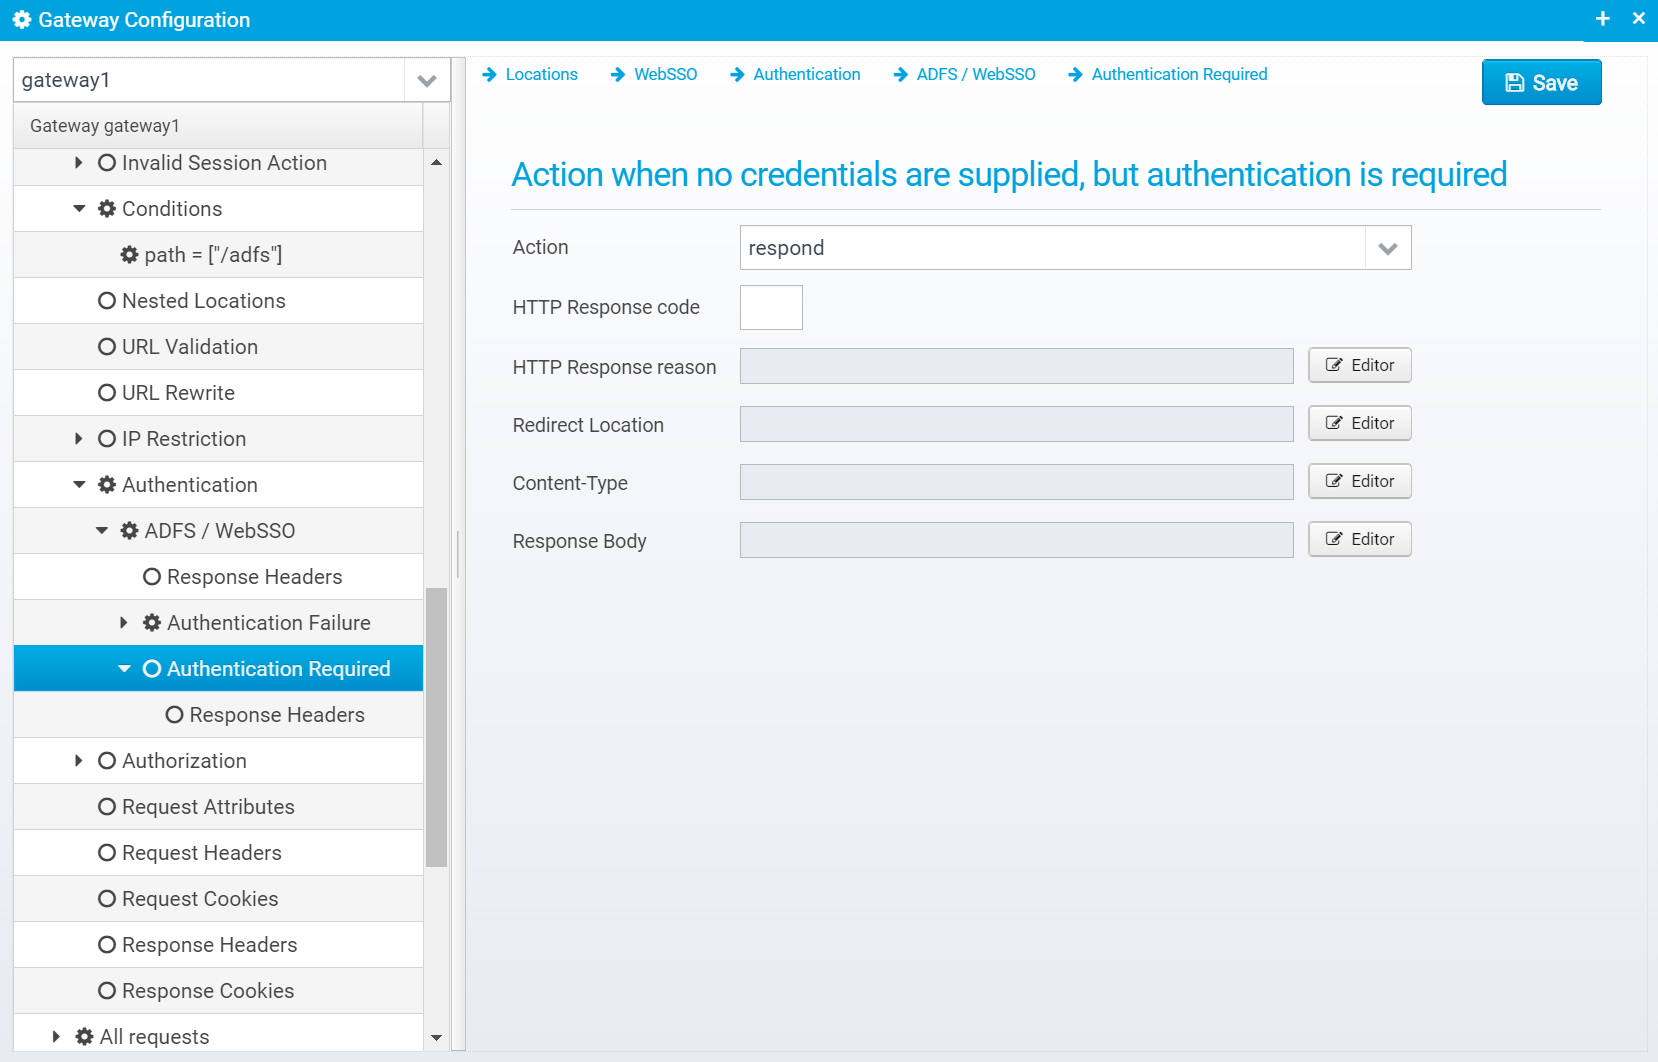
Configuration for this is stored in the JSON object redirect within the websso object.
Action when no credentials are supplied, but authentication is required
If asked to be used as an identity provider, using a SAMLRequest, in case no user is authenticated here you can redirect to somewhere else so the user can authenticate first.
Action
Action to take if authentication fails. continue=go on without authenticating, respond=respond with configured response or redirect
If action is set to RESPOND, then a response will be sent to the client with the information below.
Note that Scripts and Macros can be used to specify these values dynamically based upon request content.
HTTP Response code
HTTP Response code to send back to client.
Default: 500
JSON key: response.status
Canned Response
Specify the name of a "canned" response here to reuse it - when set, the response sent back will be the one defined in the canned response - if any other values are specified here, HTTP response code, reason etc. then these values overwrite what was specified in the canned response. Any headers defined will complement the ones specified for the canned response.
Default: none
JSON key: response.name
HTTP Response reason
HTTP response reason text
Default: No additional information
JSON key: response.reason
Redirect Location
Response Redirect Location URL - if set, a redirect will be sent instead of a normal response, the Location header in the response will be set to this value.
Default: none
JSON key: response.redirect
Content-Type
HTTP Response content-type
Default: none
JSON key: response.contenttype
Response Body
Response body contents
Default: none
JSON key: response.body
Response Headers
Response headers can also be added to the response, if any are specified, they are in an JSON array called response.headers within the redirect JSON object.
You can add headers by clicking "Add", then you get a popup where you can set the name and value of the header.
Once created, they are added to the JSON Array response.headers within the redirect JSON object, as a new object with the attributes name and value set to the entered name and value.
SSL Client Certificate
This screen is available if the authentication plugin "AuthenticatorSSLClientCert" is selected.
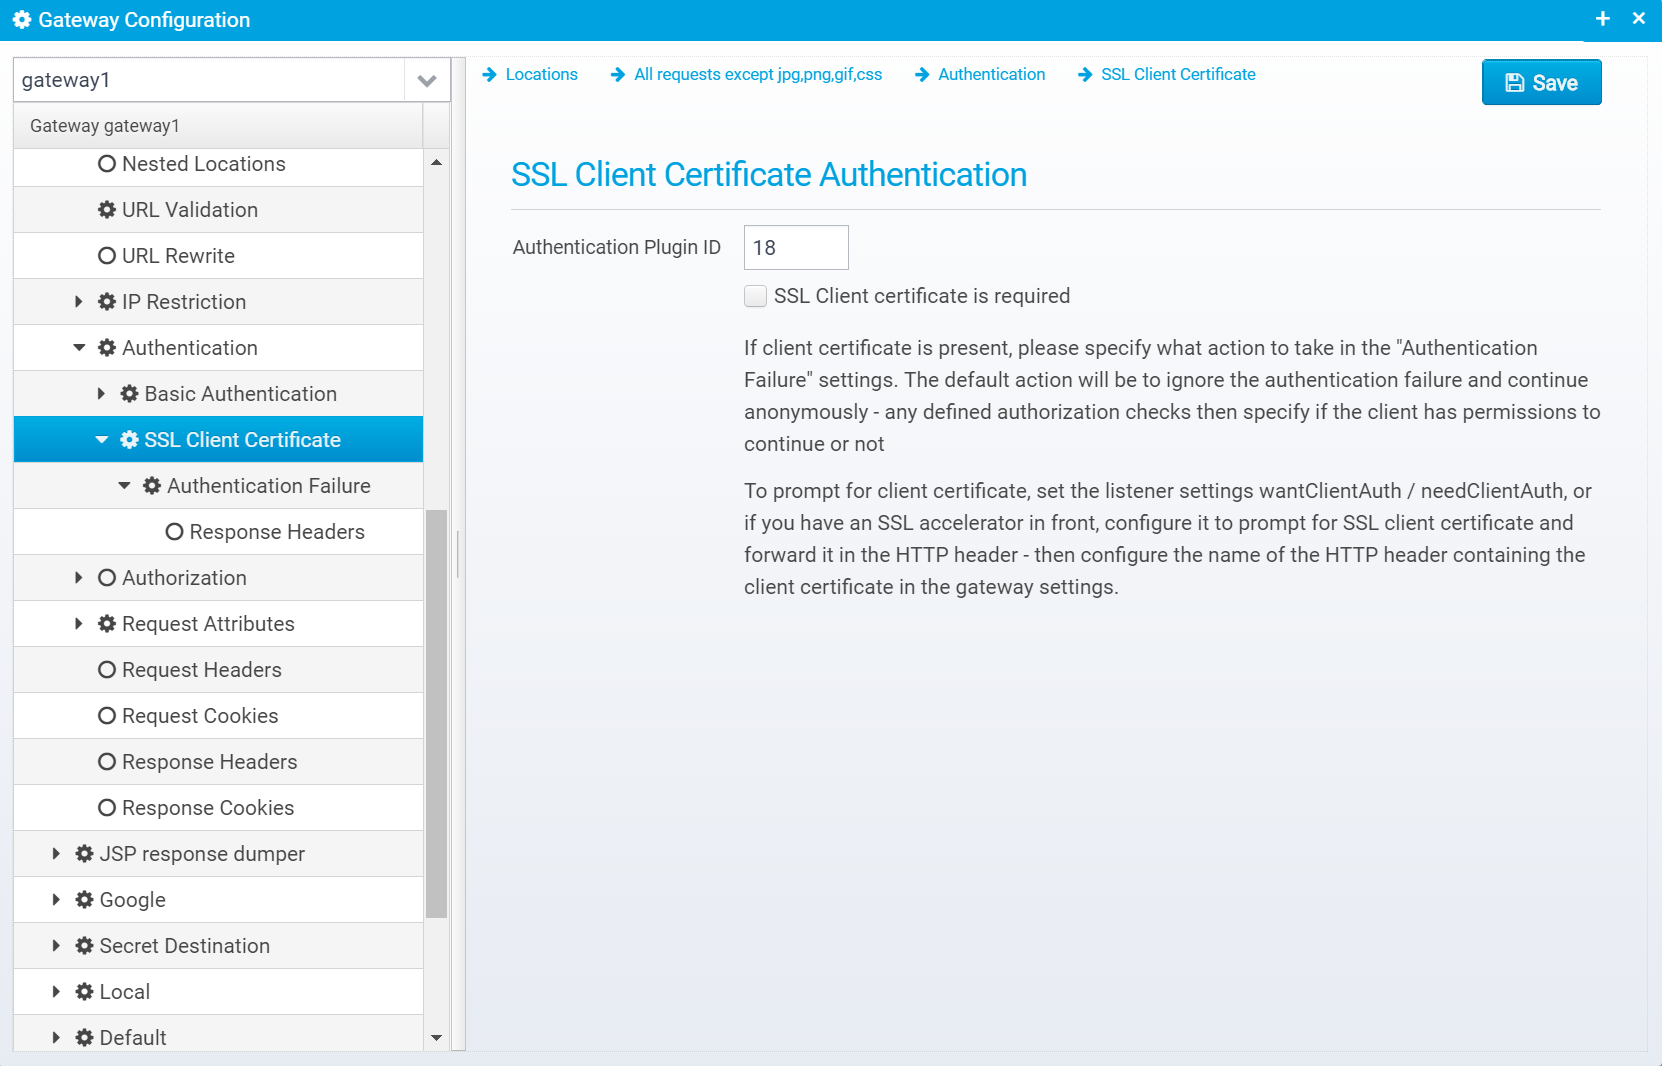
Configuration is stored in the JSON Object ssl within the authentication object.
SSL Client Certificate Authentication
Authentication Plugin ID
Authentication Plugin ID to use when authenticating using client certificate
Default: 18
JSON key: authenticationplugin
SSL Client certificate is required
If checked, SSL client certificate is required to be present - if not present, 401 is sent back to the client
Default: false
JSON key: required
Authentication Failure
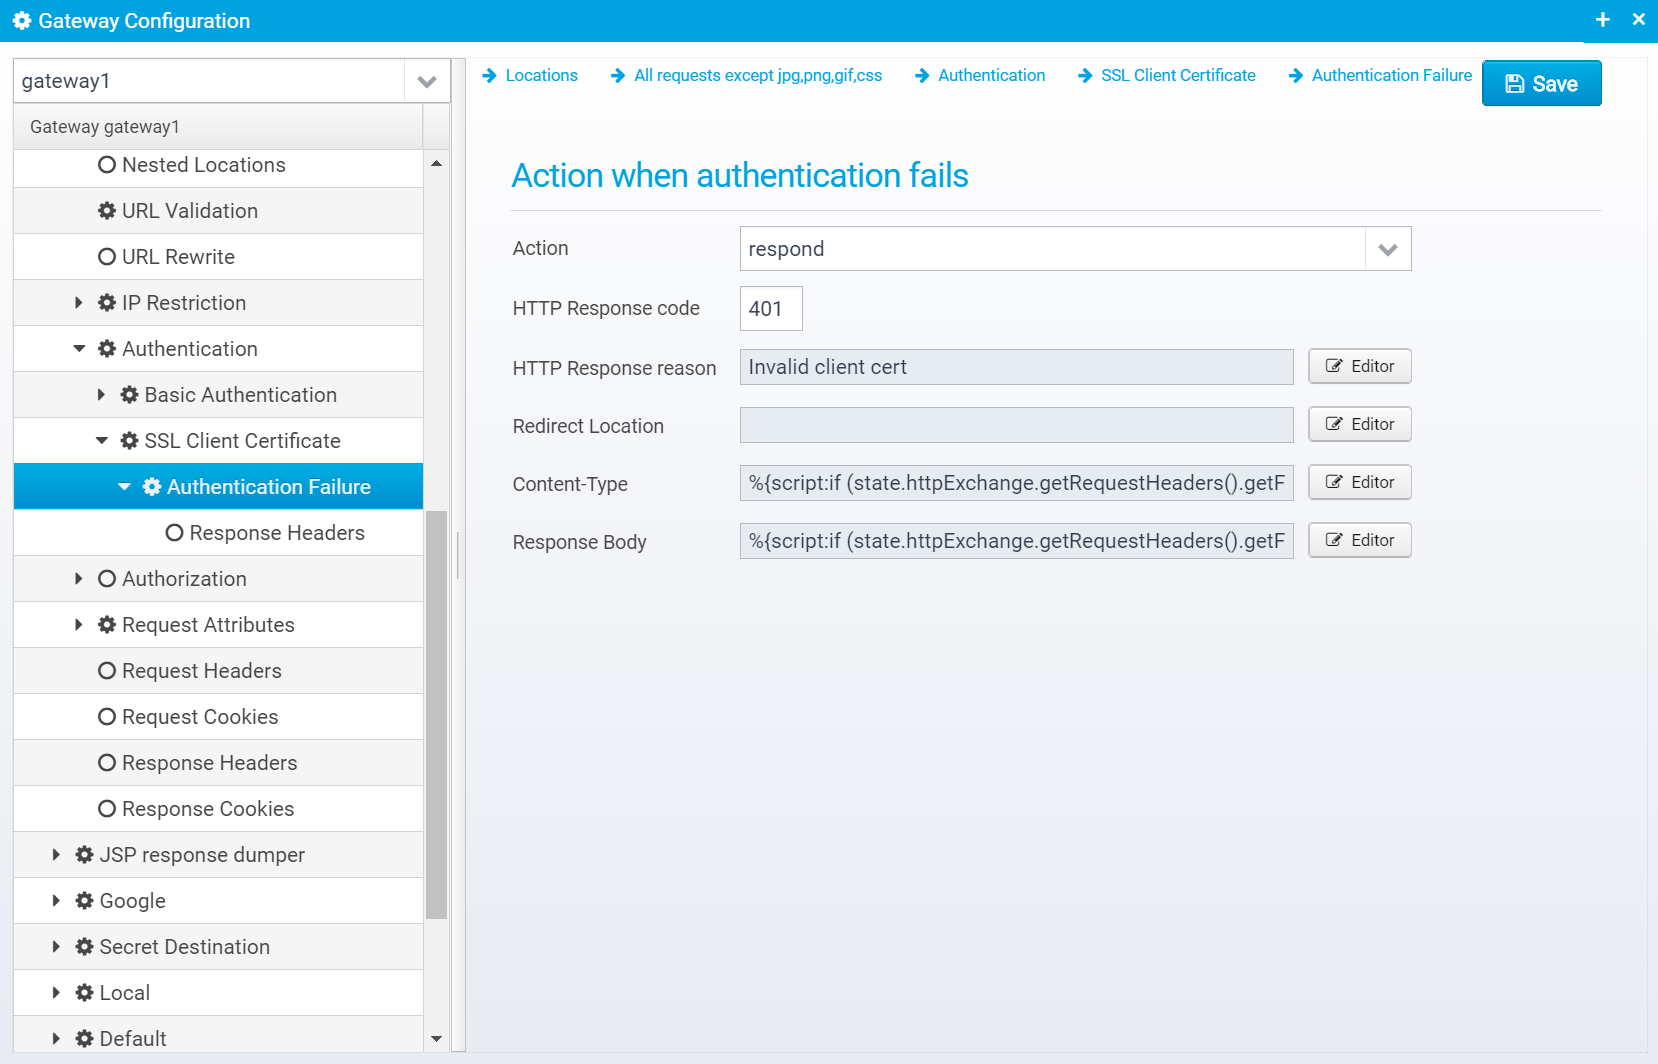
Configuration is stored in the JSON Object failure within the ssl object.
Action
Action to take if authentication fails. continue=go on without authenticating, respond=respond with configured response or redirect
If action is set to RESPOND, then a response will be sent to the client with the information below.
Note that Scripts and Macros can be used to specify these values dynamically based upon request content.
Canned Response
Specify the name of a "canned" response here to reuse it - when set, the response sent back will be the one defined in the canned response - if any other values are specified here, HTTP response code, reason etc. then these values overwrite what was specified in the canned response. Any headers defined will complement the ones specified for the canned response.
Default: none
JSON key: response.name
HTTP Response code
HTTP Response code to send back to client.
Default: 500
JSON key: response.status
HTTP Response reason
HTTP response reason text
Default: No additional information
JSON key: response.reason
Redirect Location
Response Redirect Location URL - if set, a redirect will be sent instead of a normal response, the Location header in the response will be set to this value.
Default: none
JSON key: response.redirect
Content-Type
HTTP Response content-type
Default: none
JSON key: response.contenttype
Response Body
Response body contents
By using macros such as the ones below, you can add information about the failure to the response:
<html><body>Authentication failed<p/>
Details:</br>
<pre>
%{htmlencode:EXCEPTION_LOG}
</pre>
</body></html>
Default: none
JSON key: response.body
Response Headers
Response headers can also be added to the response, if any are specified, they are in an JSON array called response.headers within the failure JSON object.
You can add headers by clicking "Add", then you get a popup where you can set the name and value of the header.
Once created, they are added to the JSON Array response.headers within the failure JSON object, as a new object with the attributes name and value set to the entered name and value.
LTPA Token
This screen is available if the authentication plugin "AuthenticatorLTPAToken" is selected.

Configuration is stored in the JSON Object ssl within the authentication object.
LTPA Token Authentication
Authentication Plugin ID
Authentication Plugin ID to use when authenticating an LTPA Token
Default: 56
JSON key: authenticationplugin
LTPA Token is required
If checked, an LTPA Token is required to be present - if not present, 401 is sent back to the client
Default: false
JSON key: required
Token Name
LTPA Token name, leave blank for default. If specified, must match one of valid token names in LTPA authentication plugin.
Default: empty
JSON key: tokenname
Cookie Name
The name of the cookie to expect the LTPA Token inside - defaults to LTPAToken2.
Default: LTPAToken2
JSON key: cookiename
Authentication Failure
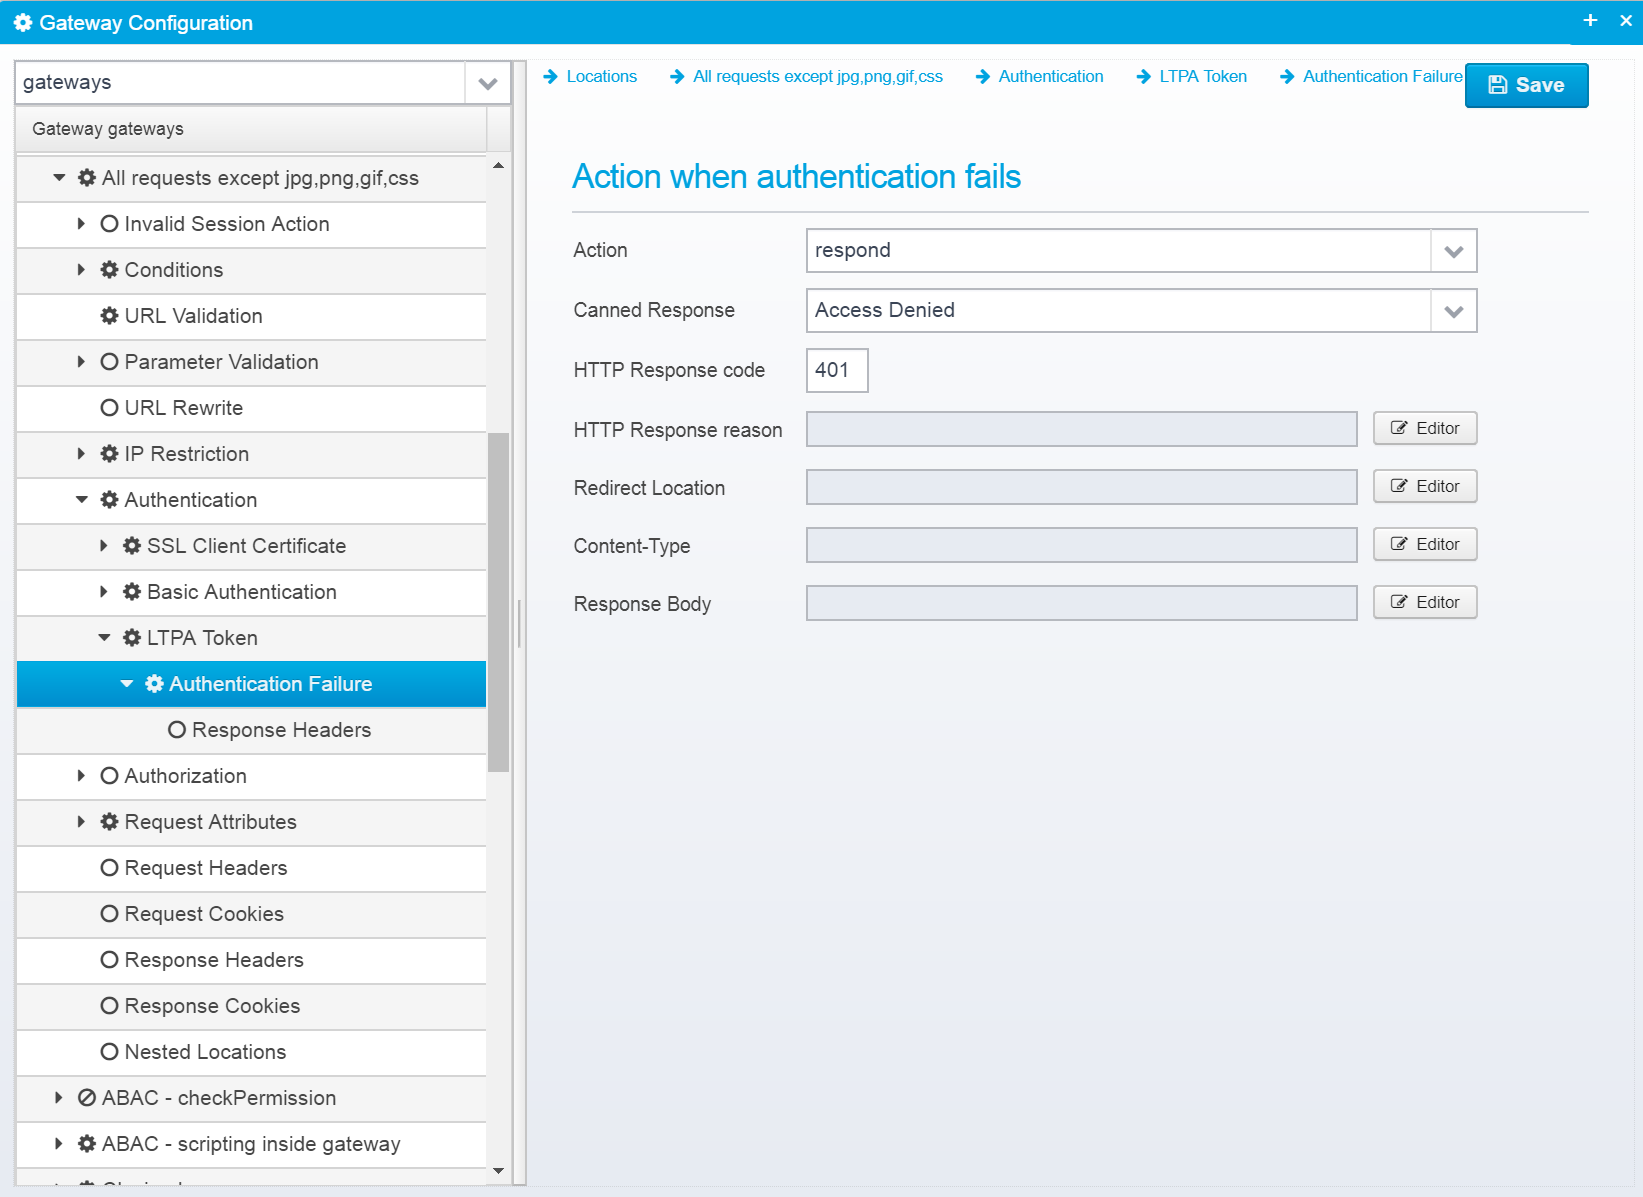
Configuration is stored in the JSON Object failure within the ssl object.
Action
Action to take if authentication fails. continue=go on without authenticating, respond=respond with configured response or redirect
If action is set to RESPOND, then a response will be sent to the client with the information below.
Note that Scripts and Macros can be used to specify these values dynamically based upon request content.
Canned Response
Specify the name of a "canned" response here to reuse it - when set, the response sent back will be the one defined in the canned response - if any other values are specified here, HTTP response code, reason etc. then these values overwrite what was specified in the canned response. Any headers defined will complement the ones specified for the canned response.
Default: none
JSON key: response.name
HTTP Response code
HTTP Response code to send back to client.
Default: 500
JSON key: response.status
HTTP Response reason
HTTP response reason text
Default: No additional information
JSON key: response.reason
Redirect Location
Response Redirect Location URL - if set, a redirect will be sent instead of a normal response, the Location header in the response will be set to this value.
Default: none
JSON key: response.redirect
Content-Type
HTTP Response content-type
Default: none
JSON key: response.contenttype
Response Body
Response body contents
By using macros such as the ones below, you can add information about the failure to the response:
<html><body>Authentication failed<p/>
Details:</br>
<pre>
%{htmlencode:EXCEPTION_LOG}
</pre>
</body></html>
Default: none
JSON key: response.body
Response Headers
Response headers can also be added to the response, if any are specified, they are in an JSON array called response.headers within the failure JSON object.
You can add headers by clicking "Add", then you get a popup where you can set the name and value of the header.
Once created, they are added to the JSON Array response.headers within the failure JSON object, as a new object with the attributes name and value set to the entered name and value.
API Key
This screen is available if the authentication plugin "AuthenticatorApiKey" is selected.
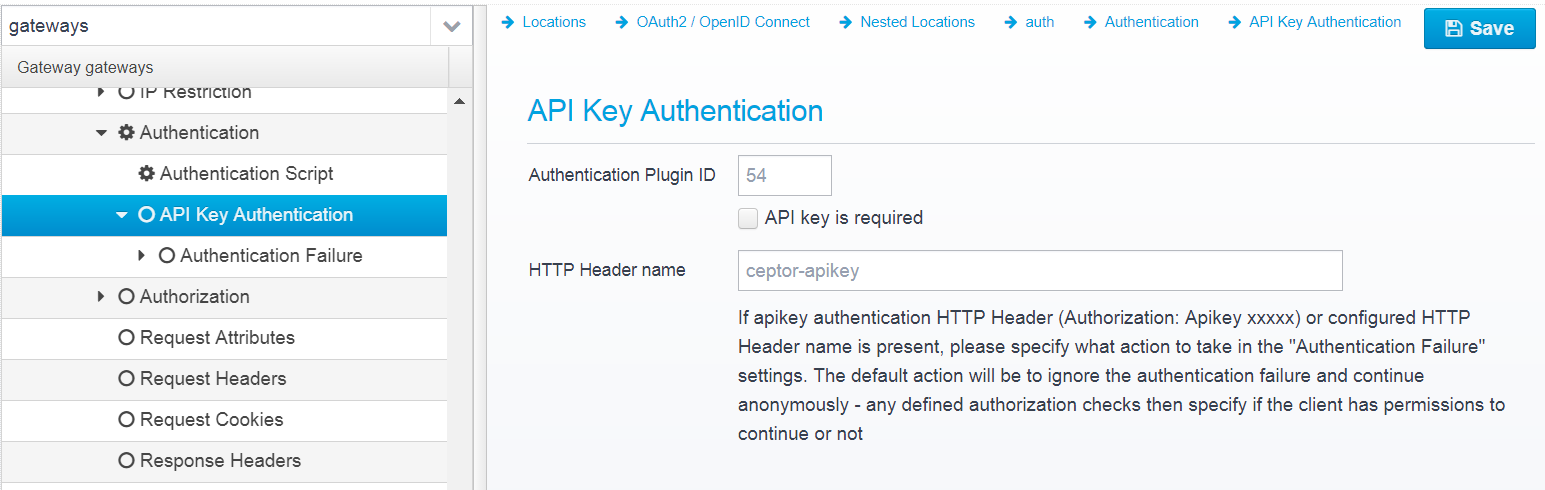
Configuration is stored in the JSON Object apikey within the authentication object.
API Key Authentication
Authentication Plugin ID
Authentication Plugin ID to use when authenticating using an API Key
Default: 54
JSON key: authenticationplugin
API key is required
If checked, an API key is required to be present - if not present, 401 is sent back to the client (can be overwritten by changing Authentication Failure settings).
Default: false
JSON key: required
HTTP Header name
HTTP header name to read HTTP token from.
An API key can also be present in the Authorization header, in the format:
Authorization: apikey xxxxxx
where xxxxxx is the API key.
Default: ceptor-apikey
JSON key: headername
Authentication Failure
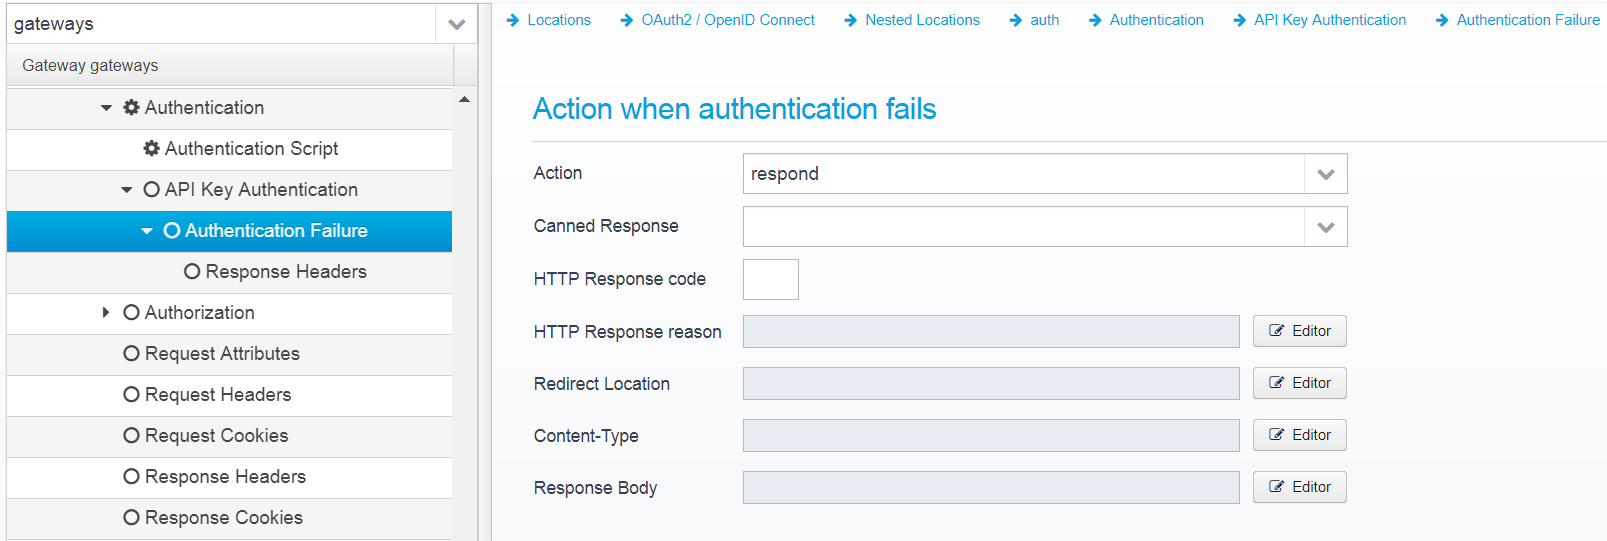
Configuration is stored in the JSON Object failure within the apikey object.
Action
Action to take if authentication fails. continue=go on without authenticating, respond=respond with configured response or redirect
If action is set to RESPOND, then a response will be sent to the client with the information below.
Note that Scripts and Macros can be used to specify these values dynamically based upon request content.
Canned Response
Specify the name of a "canned" response here to reuse it - when set, the response sent back will be the one defined in the canned response - if any other values are specified here, HTTP response code, reason etc. then these values overwrite what was specified in the canned response. Any headers defined will complement the ones specified for the canned response.
Default: none
JSON key: response.name
HTTP Response code
HTTP Response code to send back to client.
Default: 500
JSON key: response.status
HTTP Response reason
HTTP response reason text
Default: No additional information
JSON key: response.reason
Redirect Location
Response Redirect Location URL - if set, a redirect will be sent instead of a normal response, the Location header in the response will be set to this value.
Default: none
JSON key: response.redirect
Content-Type
HTTP Response content-type
Default: none
JSON key: response.contenttype
Response Body
Response body contents
By using macros such as the ones below, you can add information about the failure to the response:
<html><body>Authentication failed<p/>
Details:</br>
<pre>
%{htmlencode:EXCEPTION_LOG}
</pre>
</body></html>
Default: none
JSON key: response.body
Response Headers
Response headers can also be added to the response, if any are specified, they are in an JSON array called response.headers within the failure JSON object.
You can add headers by clicking "Add", then you get a popup where you can set the name and value of the header.
Once created, they are added to the JSON Array response.headers within the failure JSON object, as a new object with the attributes name and value set to the entered name and value.
© Ceptor ApS. All Rights Reserved.