Add SAML WebSSO Identity Provider - Step by Step Guide
- Kim Rasmussen
- Patrick Ahmed (Unlicensed)
- Kim Rasmussen (Unlicensed)
a a
This section documents how to add a new SAML Identity provider to the session controller and to the gateway step-by-step.
Once completed, this allows using a remote Identity Provider to authenticate a user.
For full details about all available configuration options for the ADFS / WebSSO Identity Provider, please refer to Microsoft ADFS Integration / WebSSO SAML
Configuring Session Controller
First, the authentication plugin within the session controller must be configured with the new identity provider - this configuration can be done either by using the Ceptor Console or by changing the configuration file ceptor-configuration.xml manually.
In this section, we assume that the xml file is changed, and that the default demo configuration is used as a starting point.
We assume the name of the identity provider is newprovider - this is just a logical name so you can choose any name you prefer.
Within ceptor-configuration.xml locate the property:
<property name="websso.identityProviders" value="local;azure;microsoft" description="Semicolon separated list of identity providers"/>
Add newprovider to the existing list, changing it to:
<property name="websso.identityProviders" value="local;azure;microsoft;newprovider" description="Semicolon separated list of identity providers"/>
Next, add the following:
<property name="websso.idp.newprovider.attributesToStoreInSession" value="*" description="Any SAML attributes matching this pattern will be added to the session"/>
<property name="websso.idp.newprovider.displayName" value="Ceptor Test" description="Display name of Identity Provider"/>
<property name="websso.idp.newprovider.identifier" value="https://ceptor.io" description="Identifier which identifies us to the Identity Provider"/>
<property name="websso.idp.newprovider.knownIPs" value="" description="Expression matching known IPs for this provider"/>
<property name="websso.idp.newprovider.metadataurl" value="https://login.microsoftonline.com/75700533-6f5e-4bd3-8730-8b46858f4e2c/federationmetadata/2007-06/federationmetadata.xml" description="URL of ADFS ws-Federation token issuer"/>
<property name="websso.idp.newprovider.roleAttributeName" value="role;http://schemas.microsoft.com/ws/2008/06/identity/claims/role" description="SAML attribute to use for user groups/roles"/>
<property name="websso.idp.newprovider.rolePattern" value="*" description="Only roles matching this pattern will be added to the session"/>
<property name="websso.idp.newprovider.signerCertificates" value="" description="List of trusted tokensigning certificates for this provider"/>
<property name="websso.idp.newprovider.url" value="https://login.microsoftonline.com/75700533-6f5e-4bd3-8730-8b46858f4e2c/wsfed" description="URL of ADFS ws-federation token issuer"/>
<property name="websso.idp.newprovider.useSubjectAsUserid" value="false" description="If true, and if subject is present in SAML; it is used as userid"/>
<property name="websso.idp.newprovider.useridAttributeName" value="http://schemas.xmlsoap.org/ws/2005/05/identity/claims/name" description="SAML attribute to use for userid"/>
<property name="websso.idp.newprovider.usernameAttributeName" value="http://schemas.microsoft.com/identity/claims/displayname" description="SAML attribute to use for userid"/>
<property name="websso.idp.newprovider.samlrequest_XML_" description="SAML2 request template - used when generating SAML request to send to identity provider">
<![CDATA[<samlp:AuthnRequest ID="%{uuid}"
    Version="2.0" IssueInstant="%{issueinstant}" Destination="https://www.server.name/adfs"
    Consent="urn:oasis:names:tc:SAML:2.0:consent:unspecified" xmlns:samlp="urn:oasis:names:tc:SAML:2.0:protocol">
    <Issuer xmlns="urn:oasis:names:tc:SAML:2.0:assertion">https://ceptor.io/adfs</Issuer>
    <samlp:NameIDPolicy
        Format="urn:oasis:names:tc:SAML:1.1:nameid-format:unspecified"
        AllowCreate="true" />
</samlp:AuthnRequest>]]></property>
The example above fits with an Azure ADFS provider - you will need to adjust the property values to match your needs, specifically you need to at least change;
websso.idp.newprovider.identifier
Must match the identity provider configuration - it identifies ceptor as a relying party / service provider.websso.idp.newprovider.metadataurl
URL for federation metadata provided by identity provider - if identity provider does not provide federation metadata, instead fill outwebsso.idp.newprovider.signerCertificateswith one or more certificateswebsso.idp.newprovider.url
The URL to use for authenticating a user.websso.idp.newprovider.samlrequest_XML_
Modify the URL and issuer name to fit your requirements.
You might also want to change the name of the attributes to obtain the users userid and username from.
More properties exists for an identity provider this just lists the most common ones to use - refer to Microsoft ADFS Integration / WebSSO SAML for details.
If you want to create service provider federation metadata to the identity provider, you can also add:
<property name="websso.idp.local.sp_metadata_XML_" description="SAML ServiceProvider Metadata - can be generated and imported at the identity provider">
<![CDATA[<?xml version="1.0"?>
<md:EntityDescriptor xmlns:md="urn:oasis:names:tc:SAML:2.0:metadata"
                     xmlns:ds="http://www.w3.org/2000/09/xmldsig#"
                     validUntil="%{validuntil}"
                     cacheDuration="PT1440M"
                     entityID="317190f9-efec-4307-beb9-7f8380a8ae16">
    <md:SPSSODescriptor AuthnRequestsSigned="true" WantAssertionsSigned="true" protocolSupportEnumeration="urn:oasis:names:tc:SAML:2.0:protocol">
      <md:KeyDescriptor use="signing">
         <ds:KeyInfo>
            <ds:X509Data>
               <ds:X509Certificate>%{signcert}</ds:X509Certificate>
            </ds:X509Data>
         </ds:KeyInfo>
      </md:KeyDescriptor>
      <md:KeyDescriptor use="encryption">
         <ds:KeyInfo>
            <ds:X509Data>
               <ds:X509Certificate>%{encryptcert}</ds:X509Certificate>
            </ds:X509Data>
         </ds:KeyInfo>
      </md:KeyDescriptor>
        <md:SingleLogoutService Binding="urn:oasis:names:tc:SAML:2.0:bindings:HTTP-Redirect"
                                Location="https://my.server.name/logout" />
        <md:SingleLogoutService Binding="urn:oasis:names:tc:SAML:2.0:bindings:HTTP-POST"
                                Location="https://my.server.name/logout" />
        <md:NameIDFormat>urn:oasis:names:tc:SAML:2.0:nameid-format:persistent</md:NameIDFormat>
        <md:AssertionConsumerService Binding="urn:oasis:names:tc:SAML:2.0:bindings:HTTP-POST"
                                     Location="https://my.server.name/adfs"
                                     index="1" />
    </md:SPSSODescriptor>
    <md:Organization>
       <md:OrganizationName xml:lang="en-US">My organisation</md:OrganizationName>
       <md:OrganizationDisplayName xml:lang="en-US">My org</md:OrganizationDisplayName>
       <md:OrganizationURL xml:lang="en-US">https://my.server.name</md:OrganizationURL>
    </md:Organization>
    <md:ContactPerson contactType="technical">
        <md:GivenName>Techcontact</md:GivenName>
        <md:EmailAddress>tech@my.server.name</md:EmailAddress>
    </md:ContactPerson>
    <md:ContactPerson contactType="support">
        <md:GivenName>support</md:GivenName>
        <md:EmailAddress>support@my.server.name</md:EmailAddress>
    </md:ContactPerson>
</md:EntityDescriptor>
]]></property>
Please adjust URLs and names according to your environment.
If you include signing and encryption certificates as above, you will also need to add configuration for these - note that any JCE provider can be used by adjusting the properties here.
<property name="websso.idp.newprovider.keystore.file" value="${ceptor.home}/config/x509/issuer/certissuer.pfx" description="Name of keystore containing private key and certificate to use when signing or decrypting SAML"/>
<property name="websso.idp.newprovider.keystore.password" value="password" description="Password for keystore"/>
<property name="websso.idp.newprovider.keystore.privkeyalias" value="" description="Alias of private key within keystore"/>
<property name="websso.idp.newprovider.keystore.provider" value="BC" description="Name of JCE provider"/>
<property name="websso.idp.newprovider.keystore.type" value="PKCS12" description="Keystore type"/>
This covers the configuration for the authentication plugin within the session controller.
Configuration of Ceptor Gateway
Now, you can either use a "login" application and let it decide when to redirect to an WebSSO Identity Provider, or you can create a configuration within the Ceptor Gateway to archieve the same thing.
The gateway can be configured in two ways, either using the Ceptor Console to create a Location with Authentication enabled, or you can paste a new location JSON into the gateway configuration.
For information on configuring WebSSO using Ceptor Console, refer to the section here: Authentication: Authentication-ADFS/WebSSO
If we start with the location, its JSON looks like this:
{
  "name": "WebSSO",
  "description": "WebSSO / ADFS Example",
  "location.enabled": true,
  "session.needed": true,
  "session.afterconditionsmatch": true,
  "session.override": false,
  "content.preload": false,
  "response.compress": true,
  "response.contenttype": "text/html",
  "action": "respond",
  "response.reason": "OK",
  "response.status": 200,
  "response.content": "<html>\n<body>Hello... %{REMOTE_USER}\n<\/body>\n<\/html>",
  "conditions": [{
    "deny": false,
    "values": ["/adfs"],
    "type": "path"
  }],
  "authentication": {
    "noauthentication.for.options": false,
    "websso": {
      "response.contenttype": "text/html",
      "identityprovider.name": "%{script}var name=state.getQueryOrPostParam(\"idpname\");\nif (name === null) name = 'newprovider';\nname;",
      "redirecturl": "%{REQUEST_URL}",
      "serviceprovider.name": "%{script}state.getQueryOrPostParam(\"spname\");",
      "failure": {
        "response.contenttype": "text/html",
        "action": "respond",
        "response.status": 403,
        "response.content": "<html><body>Authentication failed<p/>\nDetails:<\/br>\n<pre>\n%{htmlencode:EXCEPTION_LOG}\n<\/pre>\n<\/body><\/html>"
      },
      "response.status": 200,
      "response.content": "<html><body>Success - Hello %{REMOTE_USER}<\/body><\/html>",
      "federation.enabled": false
    },
    "plugins": ["io.ceptor.authentication.AuthenticatorWebSSO"]
  }
}
You can add this location using the console by going to the Gateway Configuration and selecting Edit configuration at the very end of the list in the left side, or you can copy it into ceptor-configuration.xml
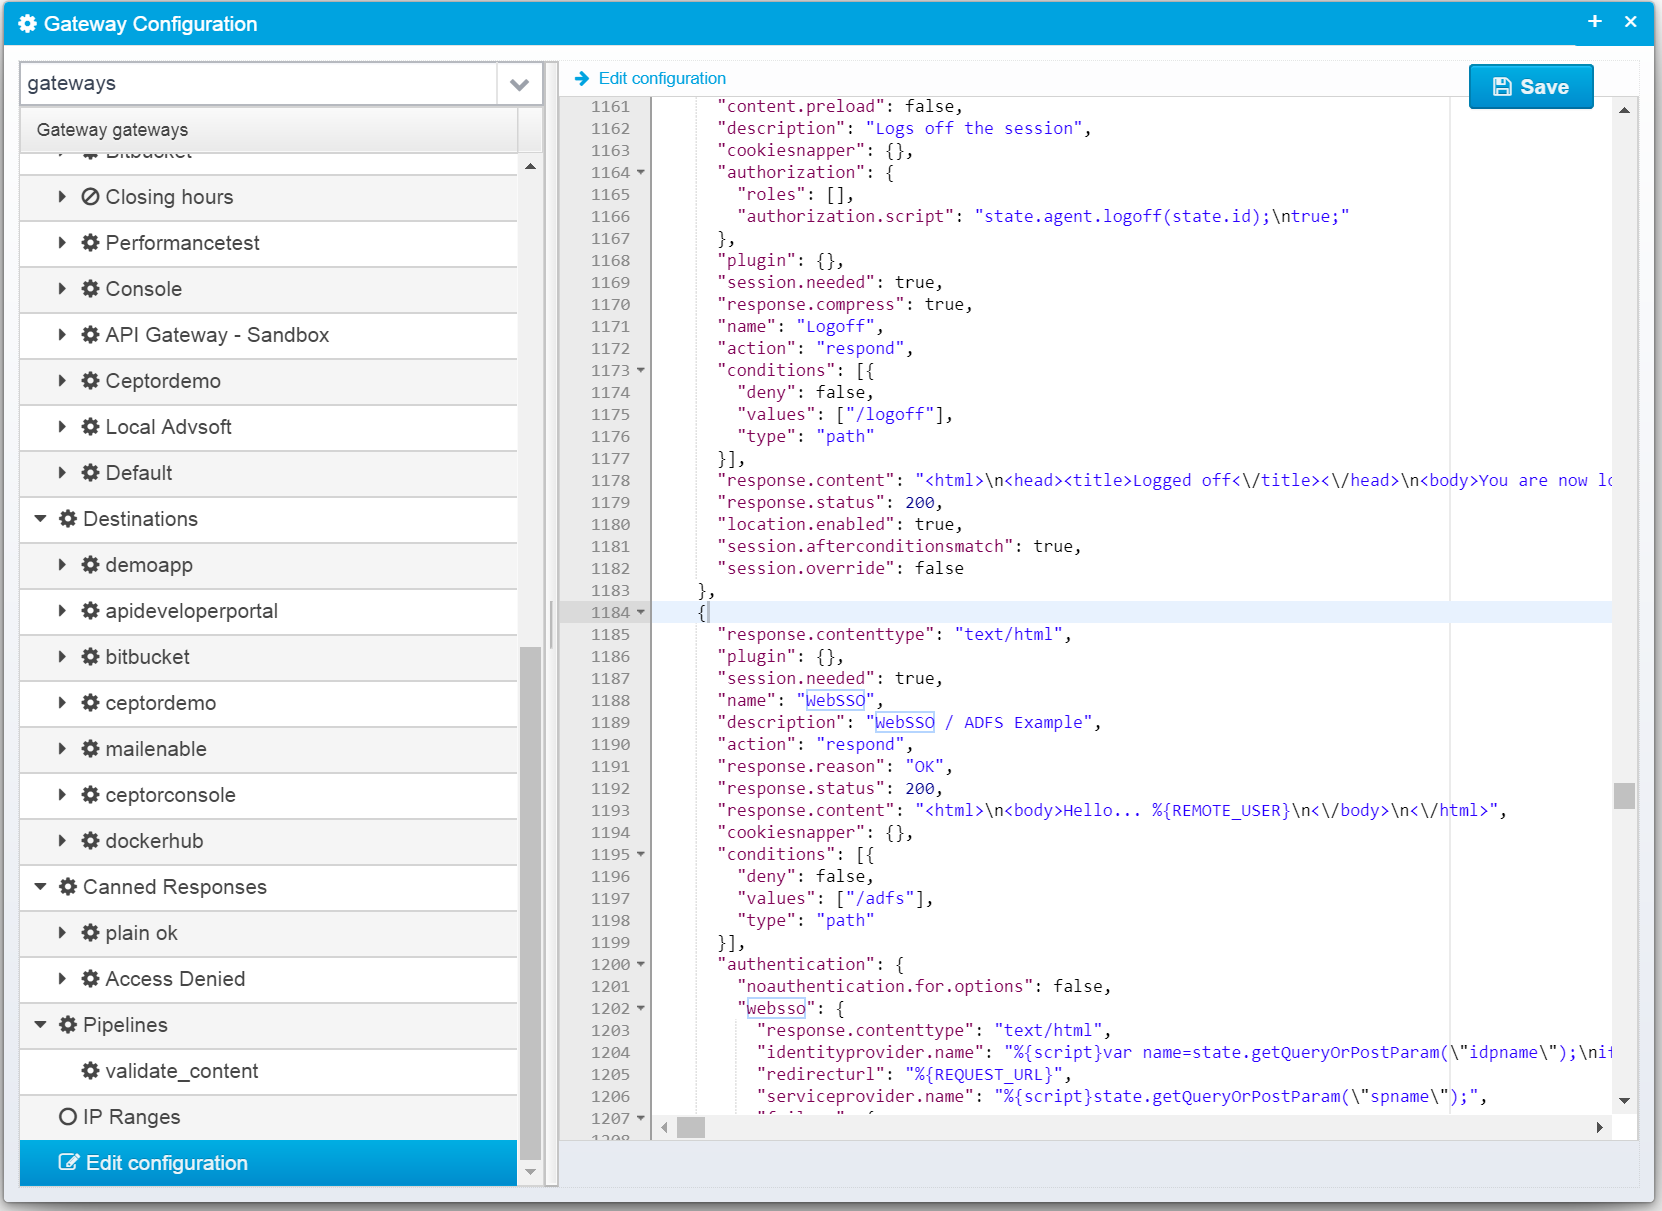
This location has the condition set to/adfs - meaning if you call ceptor at e.g. https://localhost:8443/adfs then this Location is called, and it will handle both the initial request, and also the response from the Identity Provider, calling the authentication plugin in the session controller and authenticating the user.
Once finished, if you edited ceptor-configuration.xml manually, go to Server Configuration and reload the configuration from file (see Configuration ) - or if you used the console, just commit the configuration to activate it. It will then be activated without needing to restart any components.
URLs to try
Once configured, these URLs can be tried - adjust server name, providername and path according to how you configured it.
Initiate Redirect to Identity Provider
Go to https://localhost:8443/adfs?idpname=newprovider - this will redirect to the Identity Provider and ask it to authenticate the user - the redirect back from the identity provider should hit the same hostname/path - it will contain the SAML Login Response ticket, which the gateway will pass on to the ADFDS / SAML WebSSO authentication plugin in the session controller to validate and use to authenticate the user.
Obtain Federation Metadata
Go to https://localhost:8443/adfs?idpname=newprovider&metadatasigned to obtain the signed metadata or https://localhost:8443/adfs?idpname=newprovider&metadataunsigned to obtain an unsigned version - this requires that you have configured identity provider metadata.
Tracing and Diagnostics
If anything fails, go to Gateway Tracing to see what occurs and diagnose any errors - also check the Log Viewer to find additional details logged by the authentication plugin.
© Ceptor ApS. All Rights Reserved.